Ann and Dan's Grand Fall Adventure - Beast!
Ann and I hit the road this morning on our 2018 Grand Fall Adventure, but we’d be remiss to not blog about Beast as the adventure begins. She’s our traveling companion (along with Jack) and then some. Without her, we wouldn’t be going anywhere. Well, at least not in the style to which we’ve become accustomed. And since we haven’t really done a good walk around/through of Beast, it’s about time we do just that. Face it, Beast is going to be our off-road mobile home for the next month. That and the fact that Ann and I never pass up an opportunity to show her off!
This is going to be a long post, which is probably good considering it may be some time before we’re steadily blogging again. I do have a couple of photography-related blog posts in the can to turn on while we’re on the road, but that’s probably not what you’ll want to read as the weeks roll by. I’m hoping to be a bit better about looking at my images and compiling posts during the trip. But the best laid plans of mice and men . . . you get my drift. My primary objectives are to enjoy my time with Ann and to photograph; blogging lags way behind those, but you never know, I might get motivated.
I’ll start off with a beautiful three-quarters shot of our beauty! Beast is a modified Mercedes Sprinter 4x4, which means she’s a two-wheel rear-drive vehicle until we put her into 4x4 mode, then all wheels are powered. She also has a 4WD low mode, which adjusts the gearing to give better control over power, higher torque and a slightly different power distribution for difficult situations. Technically, she’s a Regular Body (19’ 4” length, 144 inch wheel base) low roof Sprinter 4x4, with the Sportsmobile penthouse pop-top.
The photograph below shows both the new and the old. The new is the winch we recently added. The winch hook is that red and silver thing behind the removable front license plate. Above that is a small LED light bar, which is very handy for identifying potholes early morning/late night on off-road tracks. By the driver’s door is our snorkel. No, we don’t plan on diving any time soon with Beast; the snorkel is to get cooler, cleaner air to the engine. On many of the tracks we drive on, the air is a whole lot cleaner up there than down low.

On the roof, behind the main radio antenna, you can see a short stubby finger-like thing sticking up. That’s our cell-phone booster, which really does boost cell coverage by a bar or two. We unfortunately needed that to report a tragic vehicle-bison accident during our last trip to Yellowstone - we were the only ones who could get a phone call out to 9-1-1. Behind the antennas, on the roof rack you see a round thing. That’s a rotating spot light (turned backwards so bugs don’t get on the lens) that we’ve used to scout out locations to camp and shoot.
On the side of the vehicle, you see the small bathroom window and the large dinette window. Then there’s the ladder to the roof.
As you can see below, we have a platform on the roof, which we use to stand on for photography. Given the weight limits on the pop-top, we can’t store anything on it and raise the roof, but that’s not why we got the platform. In front of the platform on the roof rack you see our solar panels. They continuously charge the 2 “house” batteries we use to power things on the inside of Beast.

Sometimes the few extra feet you get from being elevated make a world of difference in how an image appears. In fact, Charlie Waite travels with a small ladder when he photographs, and will carry it out into fields and wait, sometimes for hours (even days for one lovely image) to get the image right. As he says, he hates to compromise in making an image. So here’s an image of Ann using the roof platform for its intended purpose.

Moving to the passenger’s side of Beast, there’s not really much more to see. We have an awning you can barely see in the image below, and a dinette window in addition to the sliding door on the side. There’s also a movement-sensitive exterior light and power plugs on the side if needed.

Below you can see what Beast looks like with the penthouse set up. If you remember the old Volkswagen Camper Vans, Sportsmobile made the pop-tops for them and hold the patent for it. They still have one of the old VWs on display in their Fresno show-room. From this view you can see that we also have the usual RV water and power hook-ups.

You can also see our set-up for when we’re on the road and planning to go off-road. Attached to the spare tire are a set of MaxTrax traction devices that go under the tires to help get you out of sand, snow, mud or loose ground if you’re stuck. They’re the recovery option of first choice and they work. We know from experience.
To the right of the spare tire is our recovery box. It is full of tools and recovery gear (straps, etc). Kenny may have a bigger set of tools than I have - heck, he built an over-sized garage just to house his tools - but I carry mine with us. In that box is also the fatal accident first-aid kit. From tourniquets to blood-clogging agents to simple band-aids - if you can’t save someone’s life with what’s in there, then they weren’t meant to live. Once again, something we hope to never have to break into. On the far side of the box we attach a shovel and an axe. In parts of the west, during the summer months (i.e. fire season), those are required to have when you’re off the beaten track. Also, both can be very useful in any number of situations. Again, as we’ve learned. Last, on top of the recovery box we carry a couple of leveling blocks for those times when you just have to spend the night on sloped ground.
The reason we carry all that stuff, and got Beast in the first place, is so we don’t have to think too much about heading down trails like this one in search of beautiful places and photographs. As that trail taught us, Beast is a beast and she is incredible off-road. We also learned that, yes, all that gear is necessary.

Now we haven’t abused Beast and driven around in total ignorance. While at Overland Expo West last year both Ann and I got in some driver training . . .

. . . as well as driver spotting (guiding). The instructors were as interested in seeing what Beast could do as much as we were. Needless to say - everyone was greatly impressed.

In addition to the winch, we’ve added several modifications to Beast to help minimize the potential for serious damage while traveling off-road. Most significantly, we’ve added a series of skid plates on the underside of Beast. Here’s a photograph of the great guys at Van Compass (who also did our new bumper/winch) putting on the transmission/transfer case skid plate on Beast during our trip to Overland Expo West. At the same time, they also added a skid plate for our fuel tank as well as beefed-up rear shocks.

On our recent trip up to Idaho to get the winch put on, they also added a skid plate to our rear differential in addition to beefing up our front suspension. We should be good to go!
Here’s a shot of Beast’s well-armored underside.

You can see that the plate that covers the bottom of the engine well extends backwards under the front part of the transmission. The bright spot is the gas tank skid plate. And the very far black angled-looking thing is the rear differential skid plate. Nothing beats conscientious driving (or as overlanding meister Tom Sheppard puts it “sympathetic driving”), but they don’t call them mistakes for nothing, so a bit of extra protection adds to a lot of peace of mind when you’re driving on rough terrain out in the middle of what seems to be nowhere, but isn’t.
So that’s basically the outside of Beast, whose purpose is to get us to places like this where we can spend the night close to locations we want to photograph.

Time to turn to the inside of Beast, but before we get started there, we should give a shout-out to Jack, our traveling companion, guard-lizard and all-around great guy. He keeps us company and periodically entertained, and he holds down the fort when we’re not around.

Thanks Jack!
Now it’s time to check out Beast’s living areas. This time, we’ll start from the rear. Aluminess, the maker of our rear bumper, the holders for our spare tire and recovery box, the ladder and the roof rack, have an ingenious design that allows us to swing out the spare tire and recovery box (and lock them in place) and access Beast’s rear doors. If you swing open the doors, this is what you get.
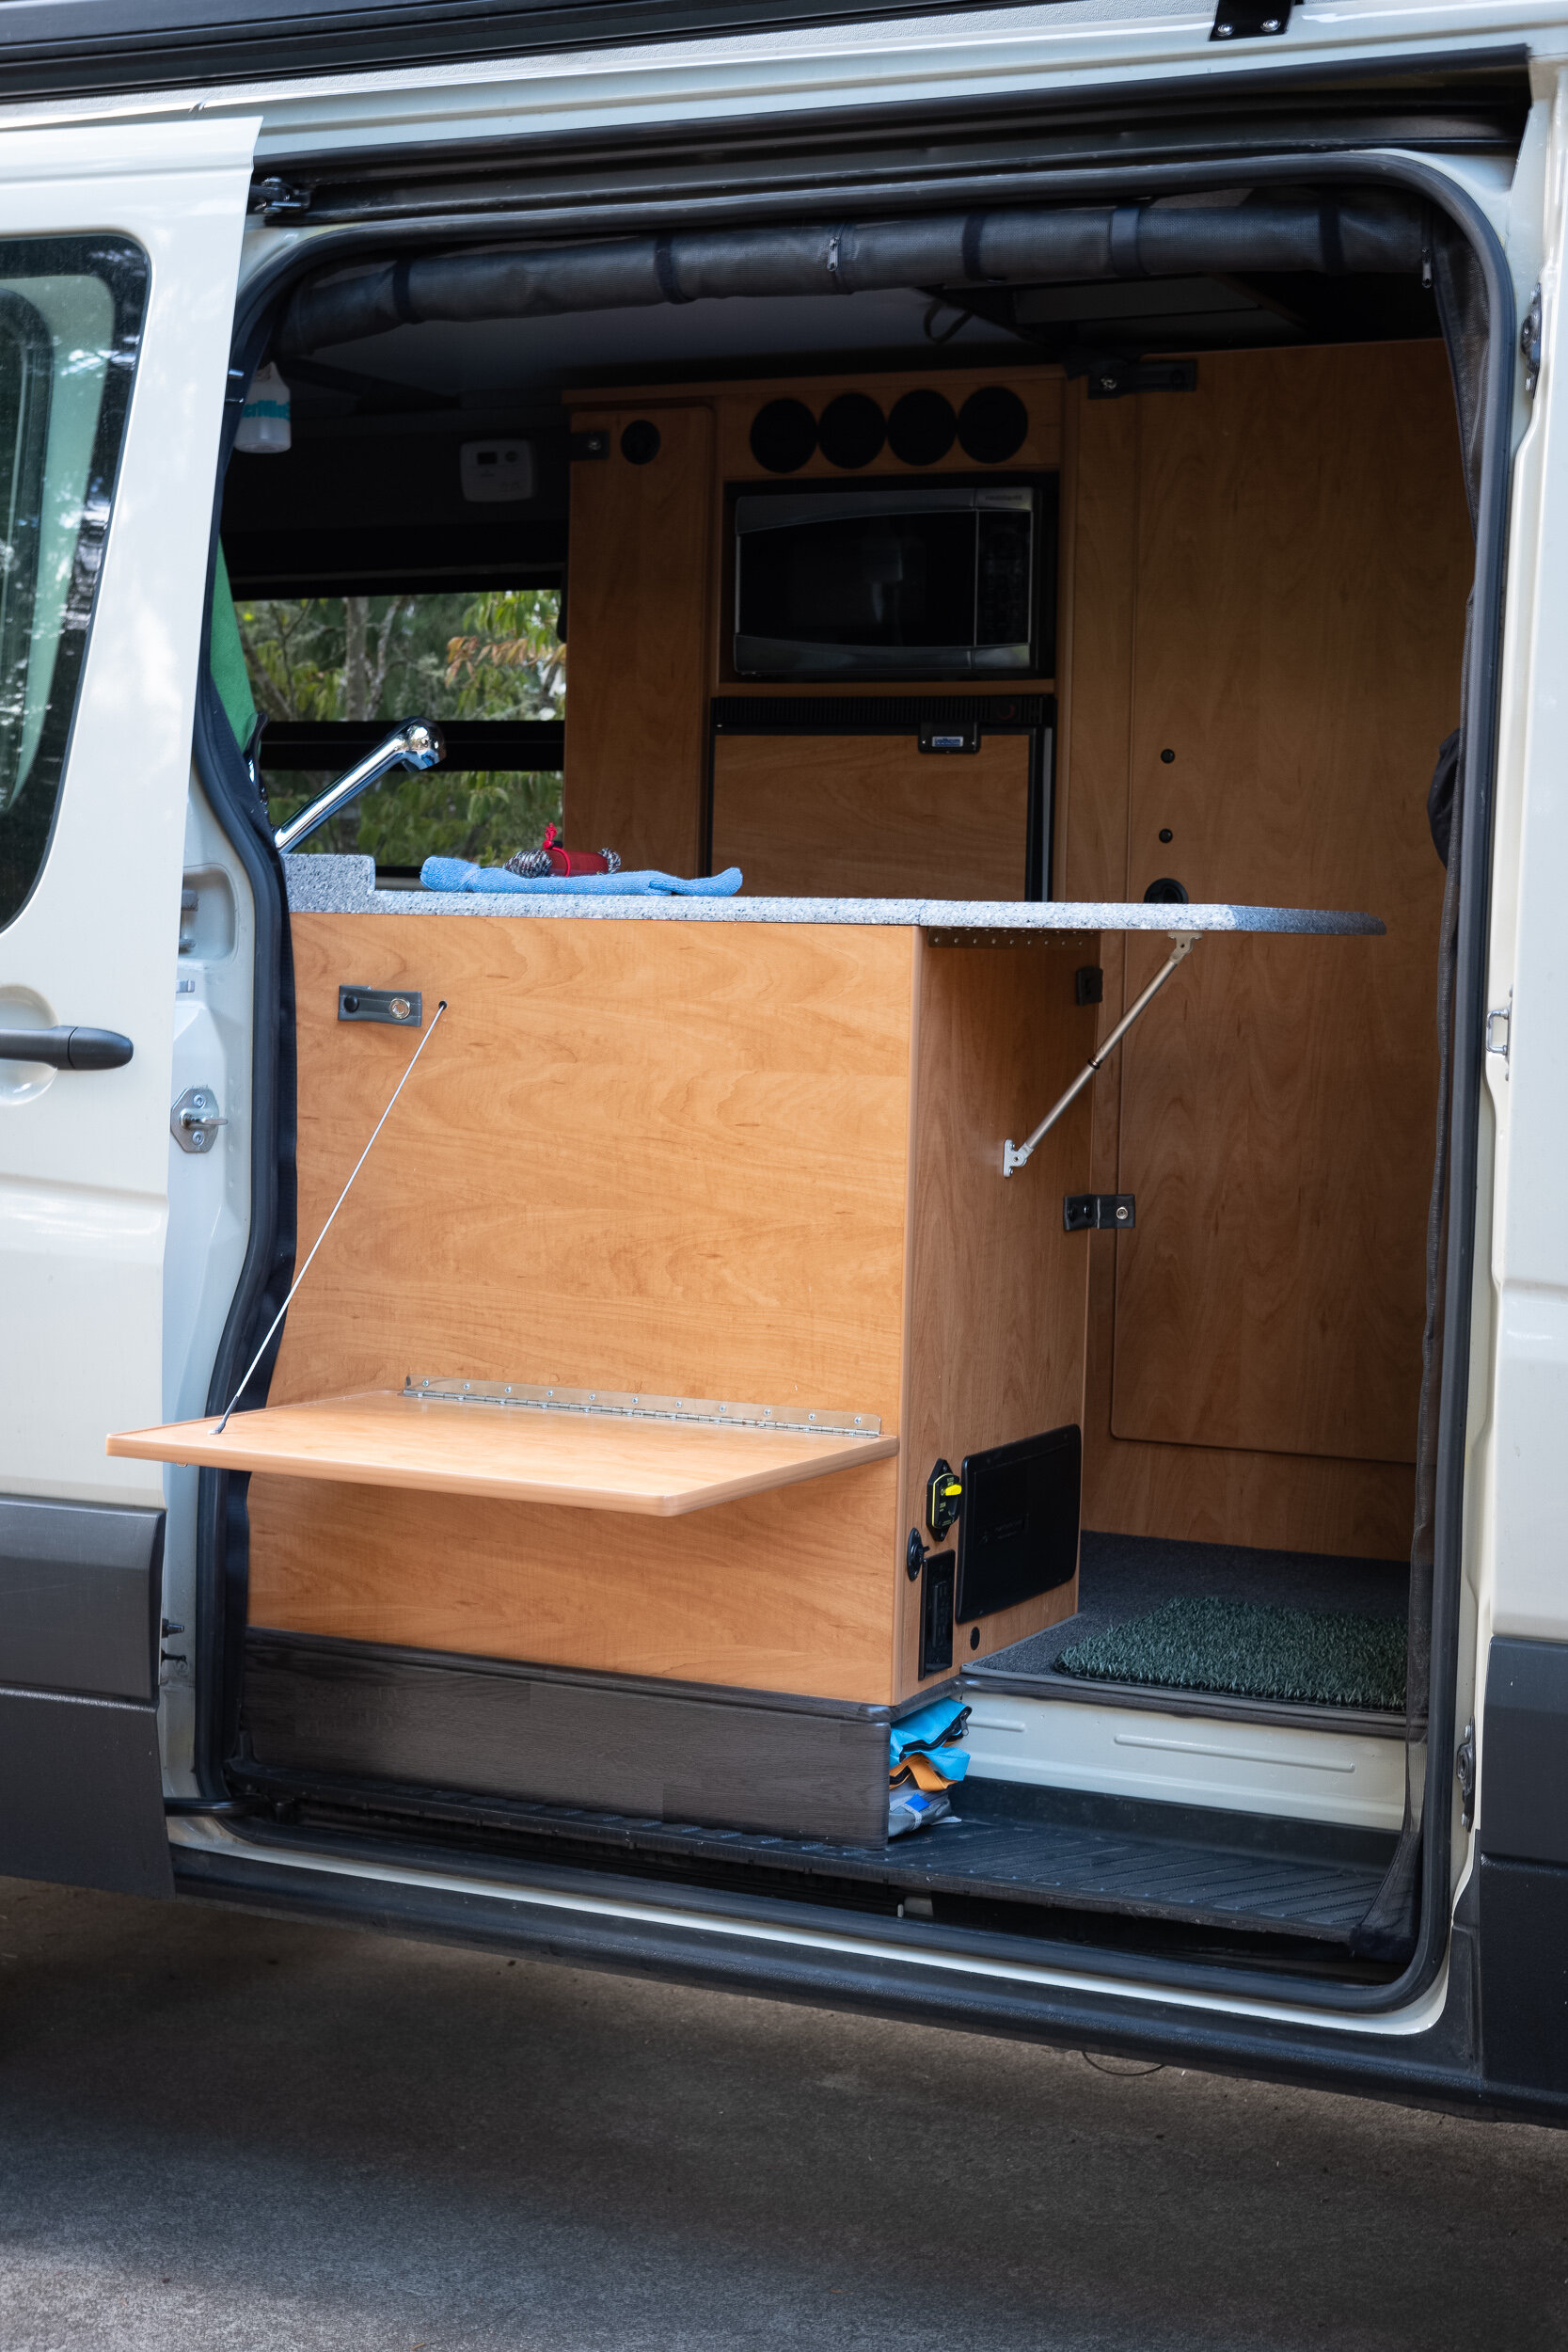
Sportsmobile has added a few features to the interior of the doors that we’ve taken full advantage of. Each door has a drop down table and small storage space behind it. On the left, we keep a power surge protector and the exterior shower hose and head; on the right a spare canvas carrying bag. Each door has two large pouches. On the left side lower pouch, we keep a long high quality drinking water hose that we use to fill up Beast’s water tank, and when we’re hooked up with a water source at a campsite. In the upper left pouch we have a collapsable two-gallon water container, and a rubber mat to stand on when we take a shower outside. The lower right pouch has another collapsable water container and a fold-up sink. The upper pouch has a black hose to drain our greywater tanks and a green garden hose for general washing. You’ll see what the big wood section across the top (where the light is located) is for when we get a better inside view.

Looking within the body of the vehicle, you see the cabinetry that Ann and I designed and Sportsmobile was glad to build. This is what it looks like at full pack out. Looking to the bottom right, you can see the two specially designed tripod storage boxes. Next to that is a small area that has cleaning supplies, mosquito repellant, spare strapping, and some rarely used tools. Above that is a larger box. You can see two fold-out chairs (very compact, but comfortable), and the exterior shower curtain. That cubby hole also has a big socket set and more tools packed in the back, to include a battery pack powerful enough to jump-start our 6-cylinder diesel engine. And yes, it’s at 100% charge. The top storage area is where our bags and some shoes go. You can access the very thin area through a hole in the side of that panel - so we keep a pair of nicer shoes there as well as our foldable hiking poles. In the main storage compartment are two large bags (maroon for Ann, sand/olive green for me) on either side with enough clothes to last us for 8 days (with spare underwear for a couple more days). In-between those are a black bag with both of our computer equipment, a camera bag for ann (on top of some boxes of full-body wipes) and our rain gear in the red pouch.
The lower middle compartment is our gear storage area - the height was carefully measured to make sure we could fit our camera bags, even if they’re fully loaded. Sportsmobile installed “L Track” on the walls of these big areas so we can strap things down for when we’re traveling on rough roads. Strapped to both walls are Ann’s camera backpack (blue) and my camera backpack (green). The orange bag that my bag is sitting on contains recovery gear - a tree protector strap, an extension strap and a pulley. The dark green bag in the middle is my shoulder camera bag. The big grey thing has our hiking boots in it, and our water boots are stuffed in there as well.

The tall space to the left is the mud room. The upper part has our laundry bag, small shower toiletry bags and bags with toiletry supplies. We will also hang jackets on the coat rack that runs across the top. Beneath the foot-mat is a folded up hiking backpack (with some emergency gear such as a portable water filter), sitting on top of a bean-bag we pull out when we’re around wildlife and want to photograph from the vehicle. The red bag is a heavy-duty bottle jack and base plate, with various extensions and attachment heads. Next to that is a power cable for when we’re at a location with shore power. And finally the black box is an air compressor for when we need to air down the tires for added traction. Though I haven’t actually tried it, I doubt I could inflate a tire with my lungs, so we carry an air compressor with us to re-inflate the tires. Off to the left you can see a small white compartment. That’s where we hook up the outdoor shower head.
Now let’s really go inside beast. When we’re parked with the top up, we slide part of the upper bed back onto a ledge on the rear and set the ladder on top of it so we have more room to move around.
Below that you see the inside of the blocked off wooden area you saw in the photograph above - it opens to the inside. We designed it to fit a particular sized storage-box and it works perfectly. In that compartment we have one “miscellaneous” storage box, and one that has our cold weather gear (hats, gloves, down coats) as well as a couple of ground sheets. There’s also space behind the speakers that we take advantage of. Off to the left is a tire repair kit (it’s hefty!), a very good first aid kit (no tourniquets though) and a box of band-aids for the little scrapes. Off to the right are the black-out screens for the side and front windows. We each also have a small pouch with battery charging devices that sit on either side. And last, as you can see, we have several blankets that fit nicely in that space. Face it, space is at a premium so we try to maximize the use of every bit of it we can find.
You can also see the three doors and the mesh access to our rear storage area.

Now below is what it looks like with the doors open. We can access most of the rear storage area from the inside if necessary. It’s easier to pack from the other side, but we can get a change of clothes, etc. without having to go outside. The mesh door was Sportsmobile’s idea. It doesn’t always turn out this way, but this back area has worked out exactly the way we planned it!
The black ovals are stereo speakers, which we can run off the house batteries instead of the vehicle battery. The silver wands are reading lights. Oh yeah, and hidden on the wall to the right, facing the dinette seat, is a coat rack we’ve installed.

Generally Ann sleeps on this lower level. As you can see, the dinette folds out into a bed. She fits lengthwise in the vehicle, I unfortunately, don’t. Well, I do, but with no room to spare.

One might think that there is a lot of storage space under the dinette seats, but unfortunately not. Space there is, but it’s all occupied. The passenger side has a 20-gallon water tank and a water pump. The passenger side has an air heater and a hot water heater and other electrical devices. None of it is usable for storage.
This is a good view showing the tall slide-out pantry, our microwave oven and our refrigerator. Below the refrigerator we have an air conditioner that blows out of the black circles you see here at the top of the image. We have to use shore power for it to operate, but when you need it you need it!
You can also see the windows behind the dinette seats. Each side has a different type of window. The passenger side has a sliding window; this one has a folding awning window that can be opened in the rain.

And here is an image taken from my dinette seat. You gotta say that it offers a pretty good view!

It’s also a good shot to point out other aspects of the interior. We have a netting system we can lower to keep the bugs out while having the sliding door open. We’ve used that often! You can see our kitchen area - yes we have a sink, no built-in stove. We have a butane stove in a bottom cabinet that we use. Off to the left is a small shelf that can fold up, which makes coffee-making in the morning much easier. You can see two drawers and the low pull out pantry to the left. The door to the right is generally not a storage space because part of the water heater is in there, as is the sink plumbing. However, there is a ledge that we’ve managed to strap down a water filter. We use to filter drinking water and then strap back down after we’re done.
You can also see power plugs, the switch for the water pump and the switch to run the radio off of house power.
Turning back to the dinette area, you see how we usually travel. We each have a “day bag” that get strapped down by a seat belt. Mine has things like insulation layers, pajamas, casual sweats, slippers and a small toiletry bag (tooth brush, medicines, etc) that I might need to grab during the day and don’t want to go clambering through the storage compartment to find. Sometimes I’ll keep a small iPad or a book in there too. They get placed up front on our seats once we’ve settled in for the day.

Above Ann’s seat is the electronic control center. On the left is the control/information panel for our solar charger. If need be, we can run the engine to charge up too, but we’ve only gotten low once when we were charging multiple camera batteries and running both of our laptops off the house battery - all at the same time. Even then we didn’t get it down more than the yellow light that says things are getting low. The next panel over is our inverter. We turn that on to run the microwave, or when we’re charging anything that needs a 110v power source. Next to that is the hot water/heater controls. We have a Danhard system that runs off the diesel from the gas tank and works like a charm if you give it a few minutes to warm things up a bit. To the right of the heater controls is a good ole thermostat. Generally when it’s really cold, we’ll keep the interior temperature around 60 degrees and it feels pleasant. It can make the space really, really hot - uncomfortably so - if we crank it up. Face it, it’s a small space. And off to the right of that is a thermostat for the air conditioner.

And if you’re wondering why we might need a heater at night, well some of the places we’ve been to and will be going to get quite cold at night. Not that we were cold though.

Turning around to look towards the front of Beast, you get a very different view of things. We took these images while doing a pack-out so we could show you how we travel. Off to the left is our bathroom and shower. Yes, the door only goes up about 5 feet so if I want to fully stand up in it, I have to remove the fabric lid.
We usually have a couple of bags between the two seats while we’re on the road. The squat green bag holds a bunch of optical gear - some binoculars to grab just in case, our long 100-400 mm lens, and a backup camera body and extra lenses. Next to it, visible in the photograph after this one, is our tan “electronics” bag. There we keep the iPads we use for maps, our walkie-talkies, our InReach and the big Magellan GPS when it’s not attached to the windshield on a RAM mount. Behind those (in the front in this photograph) we keep a bag with paper towels and snacks. You can also see that we’ve taken advantage of the space on the rear of Ann’s seat, which we’ll talk about later.

Stepping in a bit further you may notice a tan pouch with a black pouch attached to it. That’s our physical map cases. The tan pouch holds our larger atlas gazettes, which we’ll bring 3 (Oregon, Nevada and Utah) this trip, and the black pouch carries our folding maps, which we’ll bring 13 on this trip. Despite the plethora of electronic devices, nothing will save your bacon like a paper map. When we’re traveling, I will often have the relevant atlas and paper maps slipped down between the driver’s seat and the parking brake - the slot is the perfect size to hold them!
Looking up above, you’ll see the small cubby holes above each seat that was one of the nicest add-ons we paid for. Ann has a black pouch stuffed in hers (I have no idea what’s in it) and she also added a visor attachment that holds pens and stuff. My side has a fabric travel tray that holds my sunglasses (prescription, bi-focal and impact resistant from my Iraq days), spare glasses, a multi-tool, a pocket knife, a set of Leatherman Raptor shears, a mileage and vehicle maintenance (and general overall) log book and a fire extinguisher. When we go off-road, I have to pull the log book out, otherwise, everything else is either strapped down or contained by the travel tray.
By Jack you can see the GPS we use for off-road travel. While the vehicle’s GPS is fine for main roads, it doesn’t have the library of off-road tracks that you can get from a custom unit . . . so we have both. Nothing like having something that can help you figure out whether you need to go left or right, or stay straight, when the paper map and the on-board GPS don’t even show a road where you’re at.
On the right of the main console you see my phone (with my home screen of Hansi - how I miss you!) in it’s cell-phone booster cradle, which I discussed above.

As I mentioned before, space is at a premium. There are partially covered storage areas on the top of the dashboard. If you look at Ann’s side you can see what looks to be a reflective board. She has inserted a thin reflective insulator (covered with a darker material so as to eliminate glare) to keep that area cooler. Now we can put things there and not worry that they’ll overheat or melt (that’s supposed to be lip stick not lip goop).
Stepping down and out the side door, we can take a look into the bathroom area. As you can see, we use it for storage when traveling - it’s where we keep our bedding. We keep everything in two big bags (one for Ann, one for me), and two sleeping pads. We also have our recycling bag in there.
When we need to, all it takes is moving three bags and we’re ready to use the porta-potty (visible at the bottom left) or bed. The bathroom also has a shower with a hand wand. Ann has used it, I haven’t, though that may change this trip.

Stepping outside and looking into Beast, you can see where we’ve stashed even more stuff. Ann found a nice piece of kit from Blue Ridge Overland Gear that consists of a backboard with MOLLE attachment points that straps to the back of her seat, onto which we’ve attached a variety of pouches. Inside the pouches we have everything from body wipes, to aspirin, food bags, flashlights and brushes. All easily accessible. Also, you’ll see that Ann takes advantage of the hook on the door post behind her seat to hang her photography vest or a light jacket.
Towards the ground you’ll see we have two fire extinguishers immediately accessible as well as a couple of floor mats. One mat is a general mat for brushing off your feet; the rolled-up one is particularly good when we have wet weather out and you want to make sure we don’t track gunk into Beast.
Last, if you look behind my seat you’ll see a few things. First off is the map case I discussed before. Below that, in the green canvas case is a small step stool we can place outside the sliding door to decrease the drop from Beast to the ground. The 33 inch tires, plus the 4x4 lift makes it quite the drop. You’ll also see a small orange bag on the ground, which contains a couple of cloths used to wipe the windshield in the morning. Sleeping inside Beast means that we often wake up to fogged up windows in the morning. Last, in a small stretch-pocket on the seat back, I keep a flashlight on a lanyard I can quickly grab if needed.

If we step outside of Beast for a second, I can show you another one of my favorite details of our design. I’d mentioned that the kitchen counter top had a flip-up extension, but I haven’t mentioned that the rear of the kitchen bar has a fold down counter top as well.
When it’s a warm morning, or when we decide we need some coffee in the middle of the day, that’s where you’ll find me standing and making our java.
And, of course, everything gets folded down/up and secured when it’s time to hit the road. If you look down by the footwell, you’ll notice that there’s a cubby hole that, of course, we’re taking advantage of. Not only do we have a spare charger we can plug in to charge up camera batteries, we have a couple of mats to grab and stand on if we need to clean off outside. And behind those is a wonderful fold-up chair and the all important fly swatter! Our motto might as well be, “Leave no cubby hole unused!”

Now to show you where I sleep. During the interior photographs above, my “bed” was attached to the roof and elevated above head-height. When it’s time for bed though, we drop the bed and place the ladder where I can climb up into the penthouse! The plastic windows can zip open if I want ventilation, and there are roll-down courtesy blinds if I need them.

And when it’s time to hit the road, everything drops down, gets folded up and put in its proper place.

As I mentioned above, we’ve done some of our own modifications to suit our needs with Beast. In addition to a small coat rack in the dinette, I added one behind my seat. There I usually have my photography vest and whatever jacket I’ll likely be wearing that day. There’s not much room between my seat and the bathroom wall, but it’s enough. You can also see the light switch that turns on the three LED disk lights you can see in the photograph above. Last, there’s the control rocker that powers the lift mechanism for the penthouse - but only after I’ve unlatched the roof!

My most recent modification to Beast was to figure out a way to mount a small machete and field knife behind my seat so that it’s easy to access should the need arise. Much better to just reach in and grab something than have to go around and pull something out of the recovery box. I also have a Hori - a Japanese gardening tool - that has a sharp dished-shaped blade, serrated on one side, and a reinforced butt that I can use to pound in stakes, loosen ground and other useful things you wouldn’t want to risk a nice knife edge doing. And yes, I’ve talked to my police officer nephew about how and when to explain to a police officer that while I’ve got what appears to be a small blade armory within reach, I’m actually not a homicidal maniac.

So that’s pretty much it. Beast, inside and out. Our home away from home. And yes, we know - she’s way cooler than we are!

And she’s configured so we can explore the beauty of our county and find places like this to spend the night!

One final reminder. You can follow us on our 2018 Grand Fall Adventure by following our tweets on our @BeastTravels, or the track of our journey on the Garmin Mapshare site here!