Bimobil Check-Out
While the trip to Munich and then Oberpframmern (actually Aich) was a success, it wasn’t complication-free and we definitely didn’t get the 3-week road trip back to Portugal like we’d originally planned. We still hadn’t received our official drivers licenses (our cards, we only have temporary paper permits), so we couldn’t rent a car. We wound up staying in downtown Munich, which had certain advantages you’ll find out about in subsequent blog posts, but it complicated logistics getting to Aich from downtown Munich on Monday morning. Uber was the solution to that problem. As Bill Kloos likes to say, it’s only money. Our temporary licenses also caused another issue - they’re only a “B” class, so we couldn’t even test drive our vehicle (which requires a “C” class license). Another complication was that on the previous Thursday, our man Karsten informed us that he has COVID (we assume he got during his road trip to Ukraine, or the Bimobil off-road training the weekend after) and that Kris, the gentleman you folks (and us) met during our stay in Madeira, would give us the grand tour. Kris, however, speaks broken English, a bit better than our broken German, but by the end of it we figured out how to communicate and were even joking with each other. So as usual, we worked around the problem. In the end, everything worked out.
This is going to be an image rich post, and I’m going to go through the images (mostly Ann’s) pretty much in the order she made them and fill in the details based on what’s in the photograph.
For starters, here’s the vehicle in all of its glory. As you can see, it’s not what you would call height-challenged; in-fact, quite the opposite. That’s the trade-off for the ability to stand-up inside the living cabin without having to lift a roof. From here you can see our winch and front recovery points installed on the bumper. If you look just below that, you see some slats. The Iveco Daily 4x4 comes with its own front skid plate, which offers engine protection off-road. There’s not one under the front differential, which is a few feet behind the front skid plate, but there is one beneath the rear differential - again, for protection.
Up top you see the off-road night lights. I’m impressed with the number of safety measures that are incorporated in the vehicle add-ons. Perhaps it’s to comply with German regulations, but they’re helpful. In this case, the upper bar lights will only turn on if the high-beams are on, even if the switch inside is flipped to turn on the night-lights. I think it’s a good way to easily not blind someone coming in the opposite direction - simply turn off your high beams and the overhead lights turn off too!

As you can see, the vehicle rides much higher than Beast. Not only is this a real truck chassis, it has larger, 35” tires, which lifts the vehicle body up even more than the 33” tires on Beast. Consequently there is a step to get up into the driving cabin, which offers a great view of the road. Might be time to hit a stair-master to get used to the up and down.
We started with a tour of the inside of the living cabin. Here you can see our refrigerator and gas oven on the left as well as the dining area on the right and the main bed in the background. We were pleased that the seating fabric turned out as well as we’d hoped. Colorful, yet not too distracting and able to hide any little stains that might befall the cushion. At night, the rear headrest can be removed and the supporting backboard dropped for easy access into the bed. You can also see the three small cabinets in the bed area as well as a couple of scoops where you can put things like phones, etc. for the night. We also added a couple of 12v outlets up there so we can charge our phones while we sleep. And, of course, the skylight.
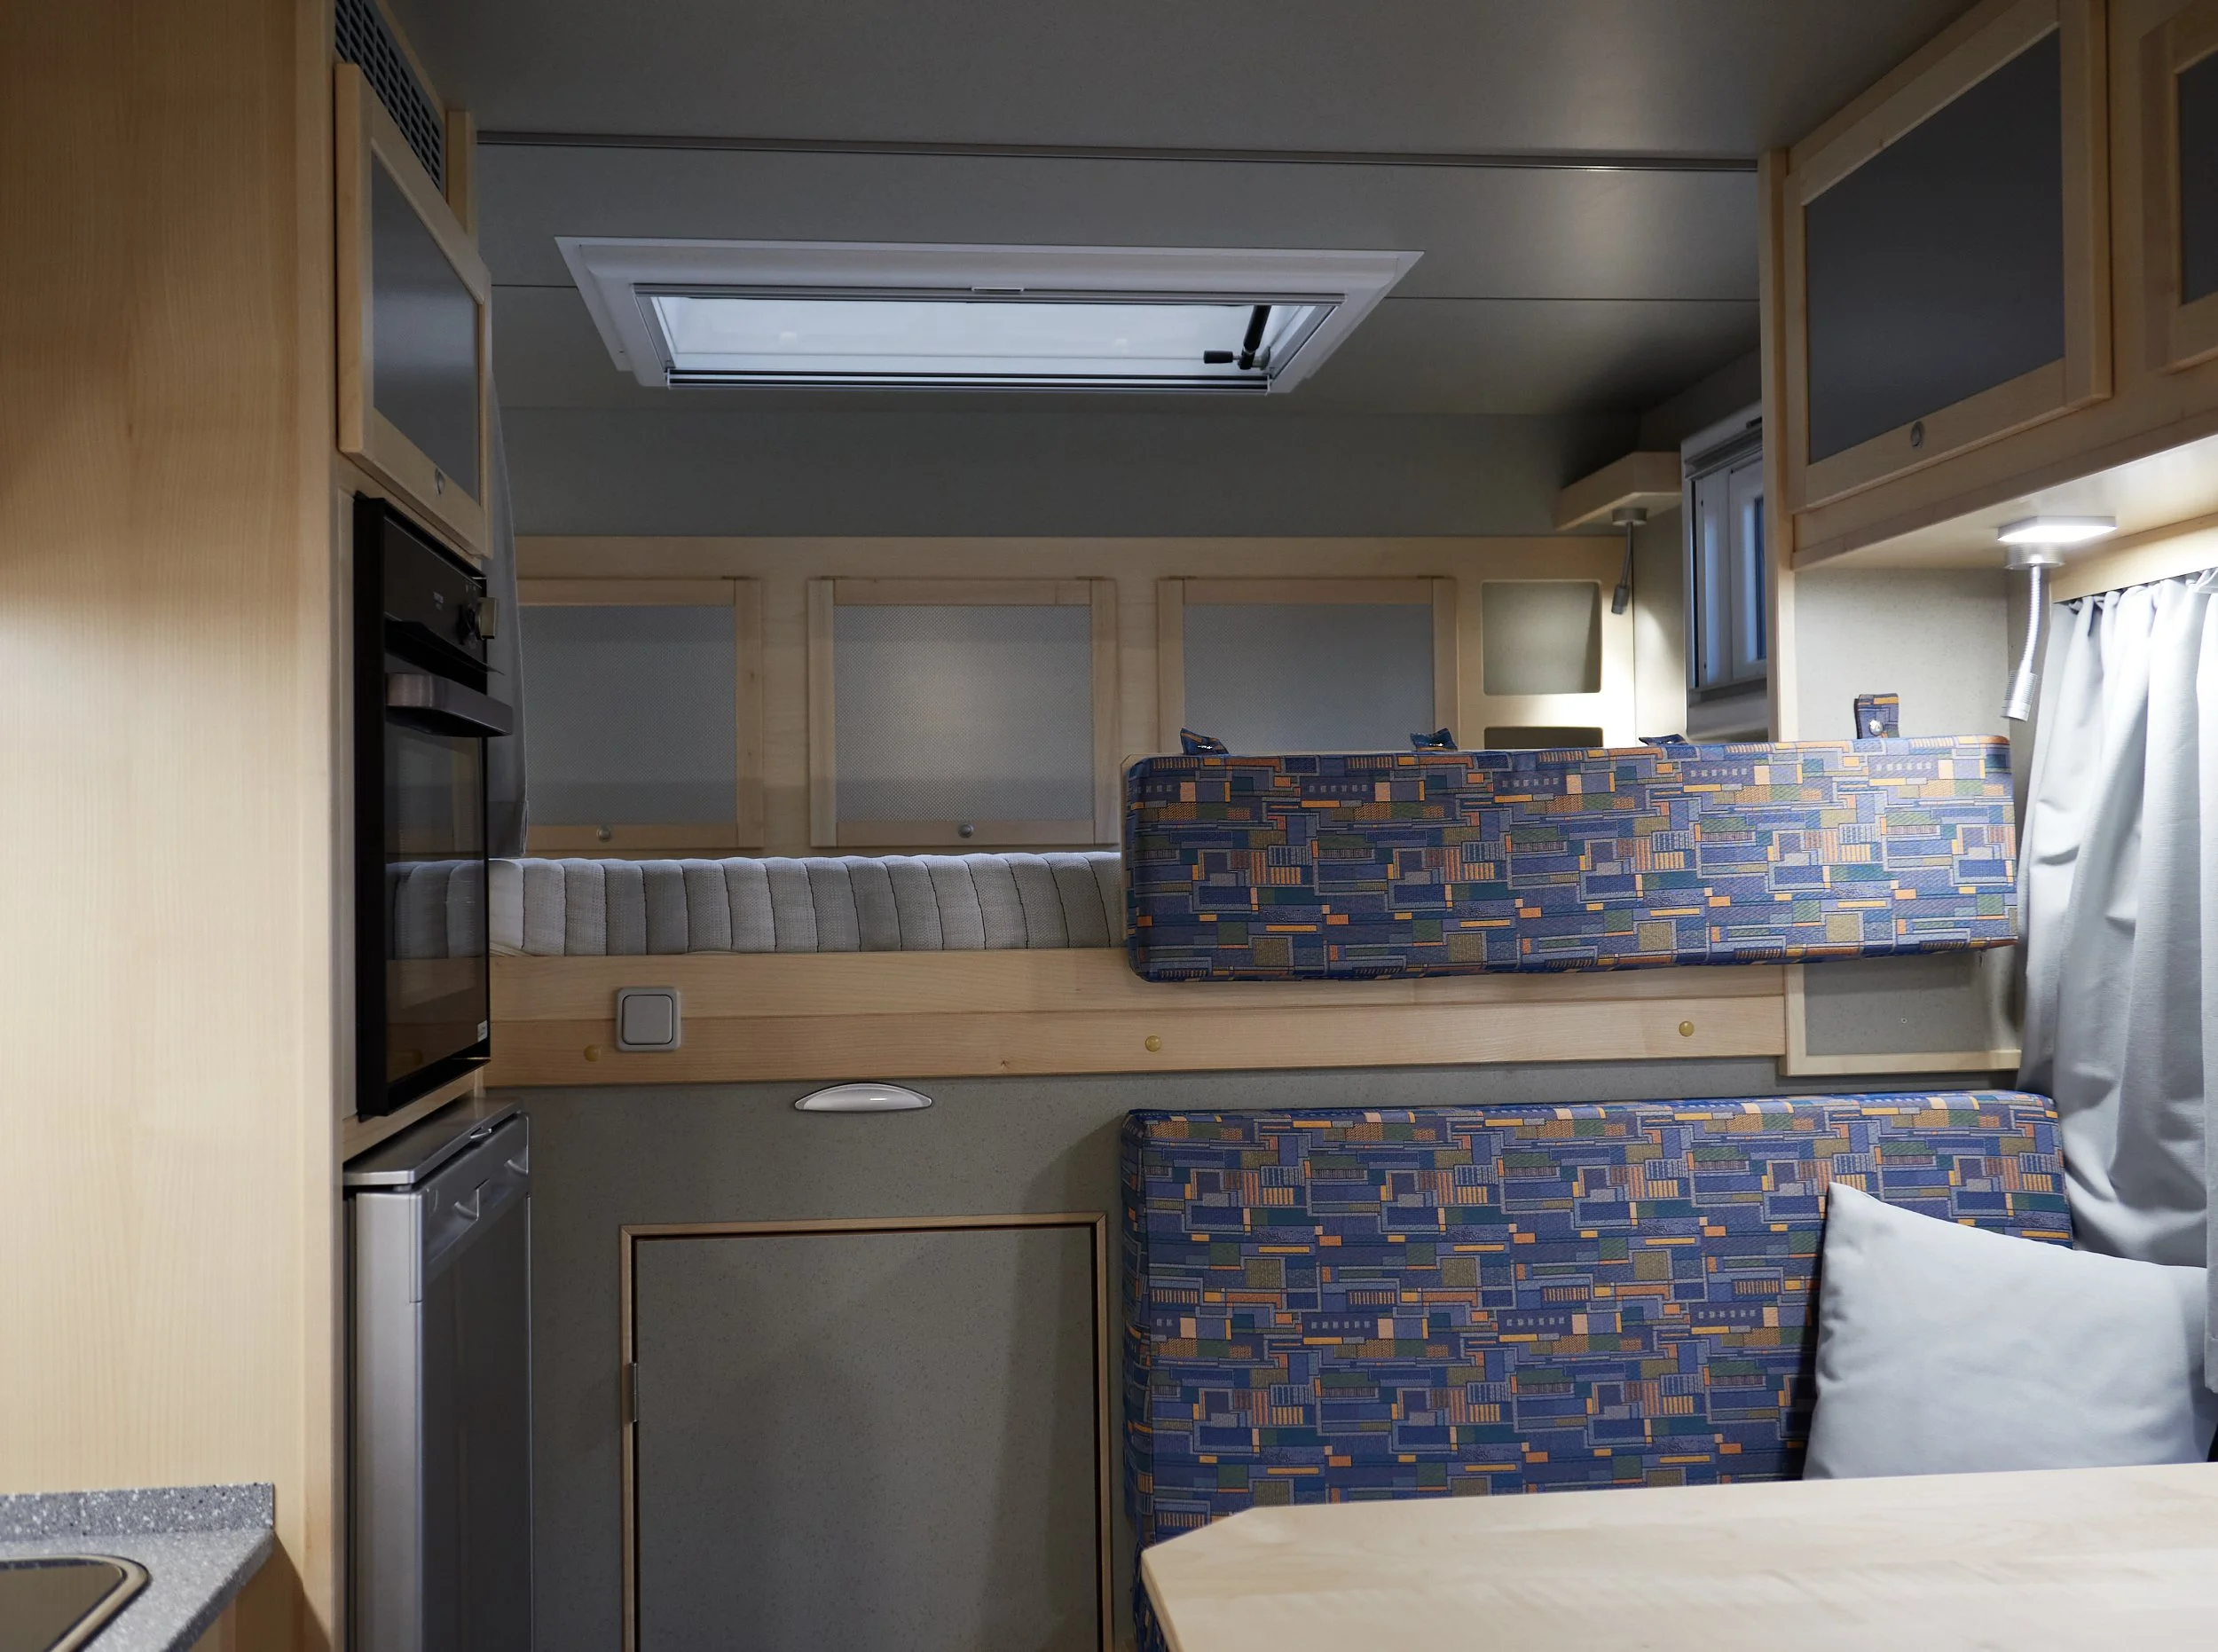
Looking off to the right, below, you can see the overhead lights as well as reading lights in the dining area. Each light can be dimmed, which is great. And of course they’re LCDs, which means minimal draining of the house batteries during use. You can also see the strut for the moveable side wall. There’s a better photograph of that feature later on. And of course there are upper cabinets. The tremendous amount of storage in this floor plan was one of its main draws for us. This should be a vehicle we can easily live in for weeks at a time.

Looking to the left, you can see the gas stove, refrigerator and upper storage cabinets in the kitchen area. To have a true gas stove should be fantastic on days where we’re taking a break and want a good meal. Just to the right of the oven you see a light switch. That switch turns on night-lights in the cabin and the bathroom for those times you need to get up in the middle of the night. The bed is on a Froli system, which uses a series of rubber “springs” on the base with a gel-foam topper mattress. The mattress may be fairly thin, but on top of the springs it’s more comfortable than our bed at home. From this shot, you also have a good view of our skylight. You can see a lever on the strut. That lever allows one to raise and lock the strut at any window opening height. Let it go all the way up and we have an opening big enough to climb on the roof (for photographs! . . . oh and maintenance too).

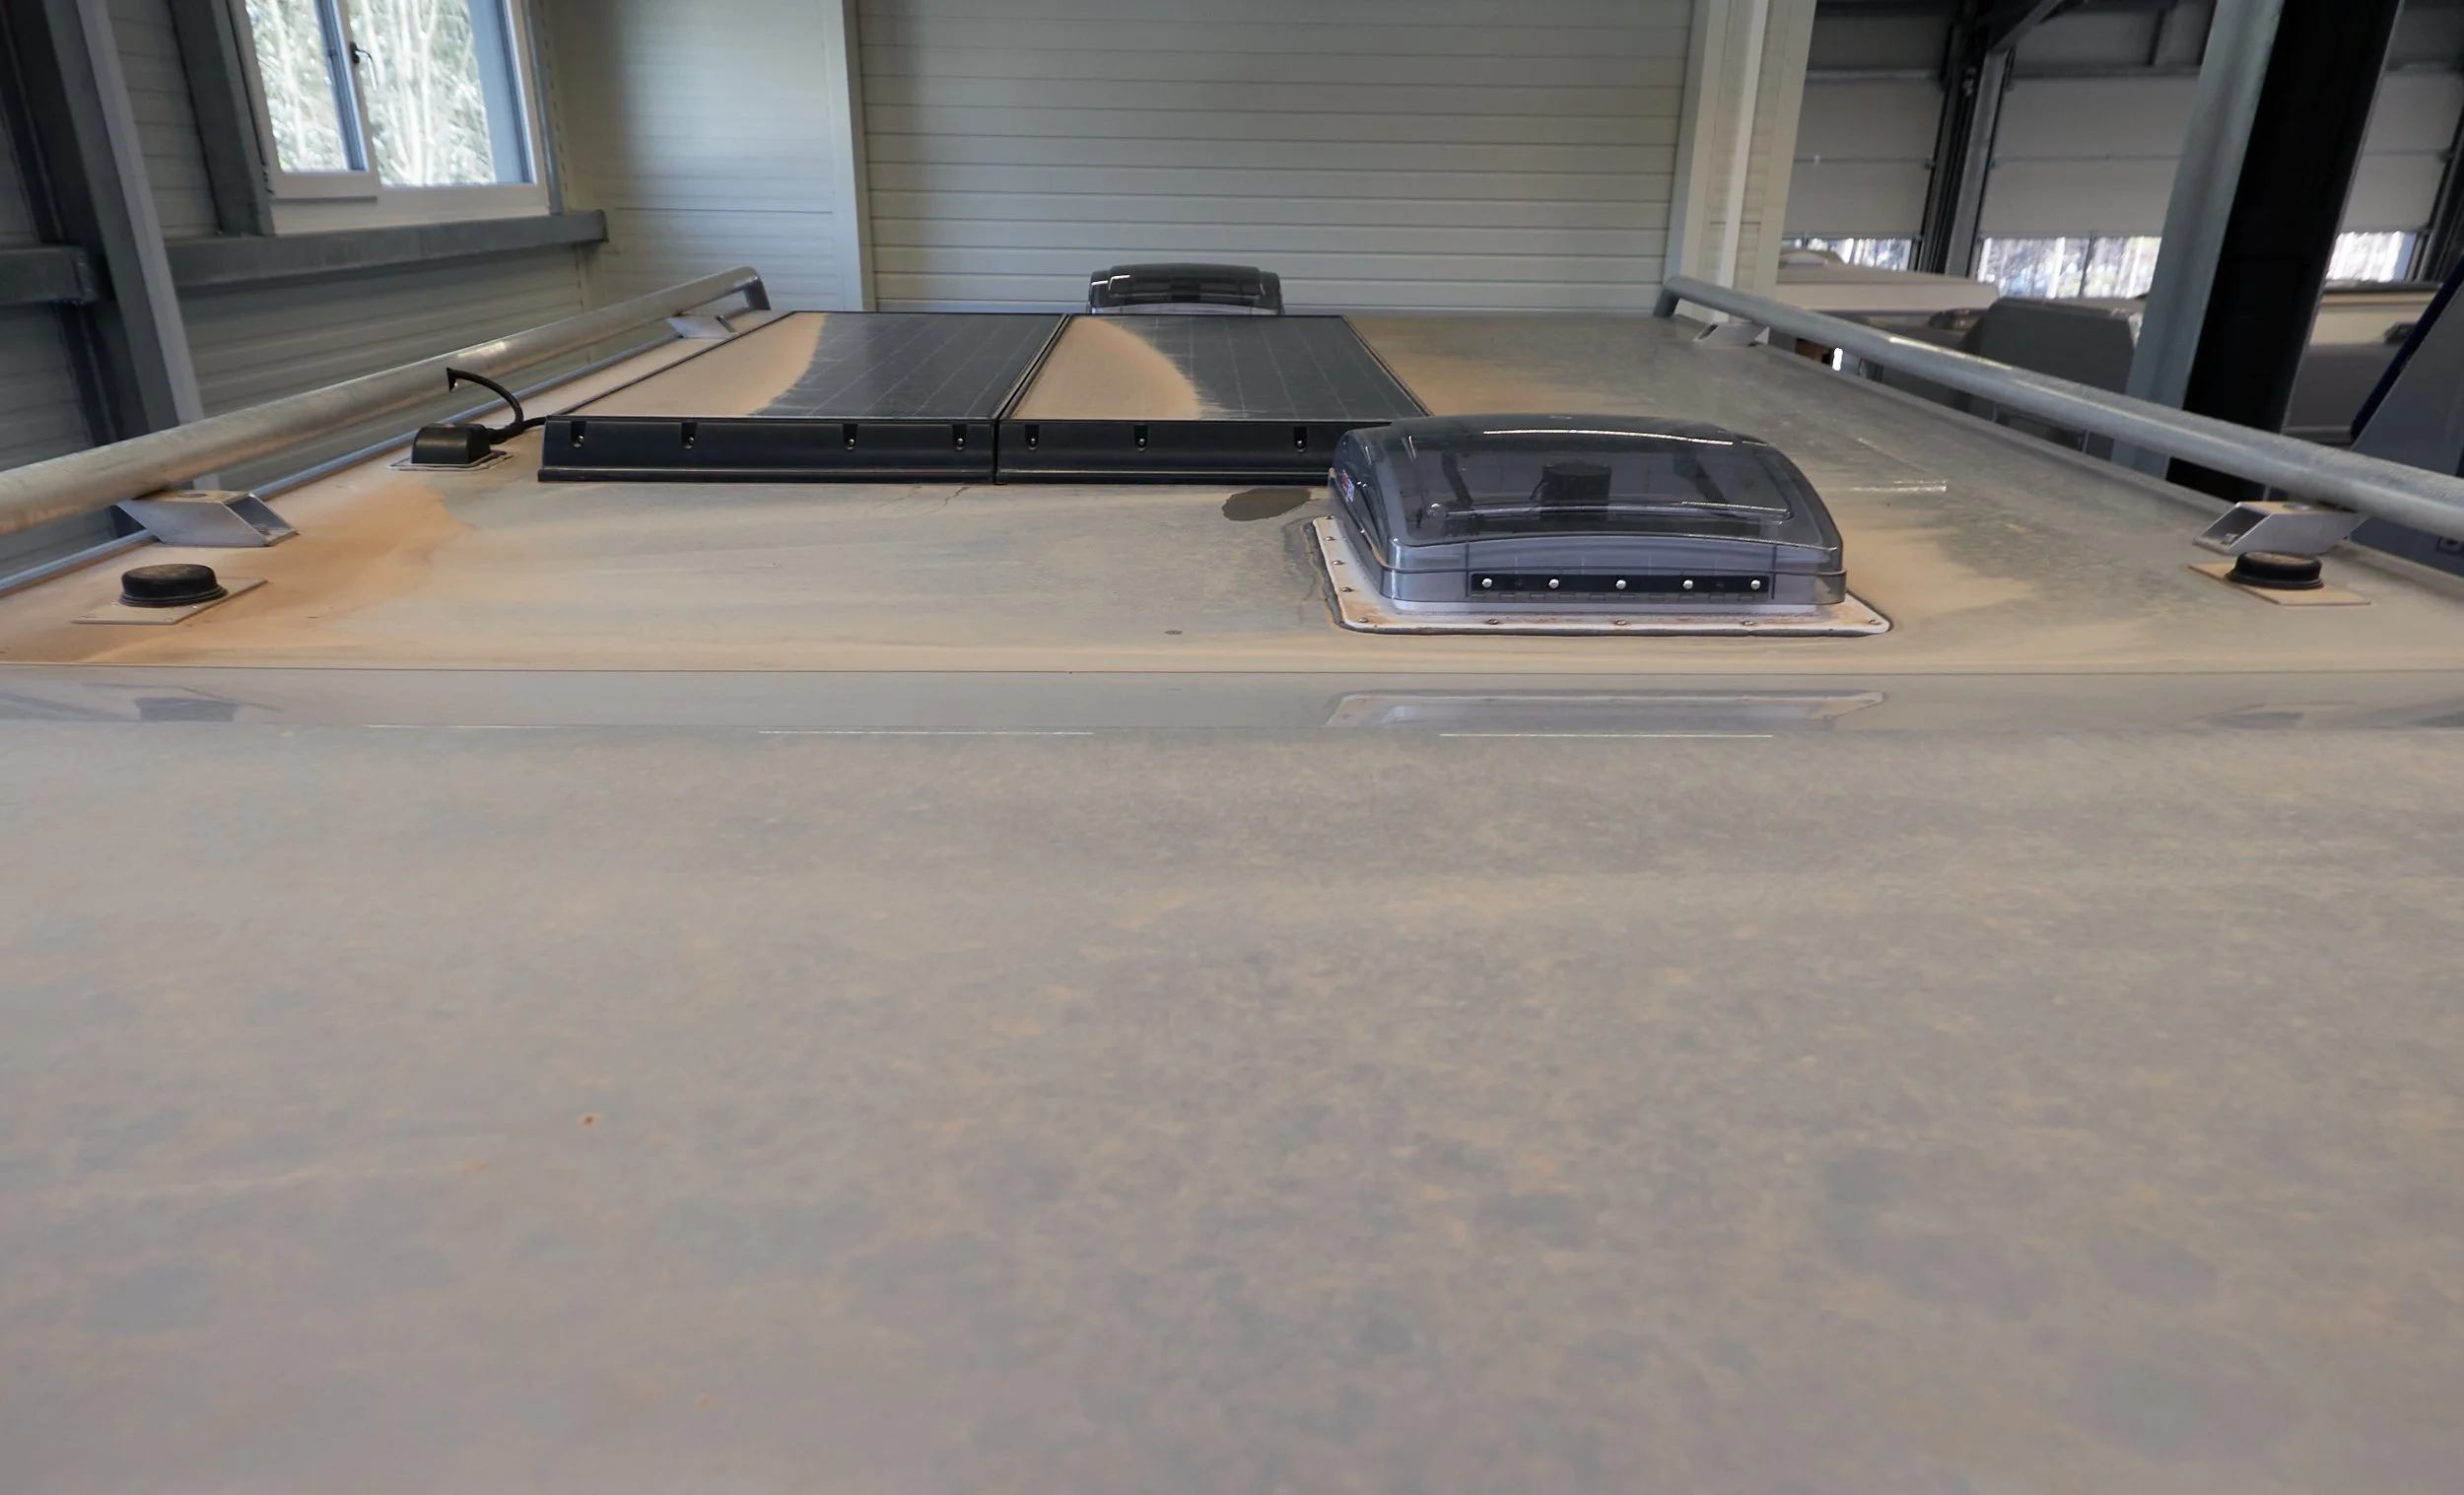
The top is strong enough to hold a person (and a tripod). From here you can see the two overhead fans we had installed (one in the kitchen, one in the bathroom), which can blow in either direction and will hopefully give us a lot of air circulation when it gets really hot. They can also be programmed to turn on if the living cabin reaches a certain temperature. You can also see our two solar panels, which on a good day should totally recharge each of the two lithium batteries we have.
As for the dirt, well, the vehicle had been outside when the Sahara storm I blogged about recently made its way to Germany. I guess I can say that our bimobil has seen a bit of Africa even before it left the shop!
Returning back to the bed area, you can see the two night-lights as well as cubby hole storage area. The windows are really nice. They’re double paned hard glass with blackout and mosquito screening that can slide up/down within the frame. All of the windows, to include the skylight, have the same screen system.

Below is that better view of the dining area wall that can be lifted up to give you a good view from the dining table. There is, of course, a window in the wall that can be opened if that’s all you want. We figured that the wall unit would be a good way to open up the space to enjoy a nice view during dinner. Or to allow people from the inside to chat with folks lounging outside..
The table has a couple of levers on it. One allows you to move the table-top around, and the other lets you lower the table and make a bed in this area. Technically, the cabin could sleep 6 people and, between the driving cab and the four seats in the dining area, we could transport 6 people. Yes, the dining seats have road-legal seatbelts.

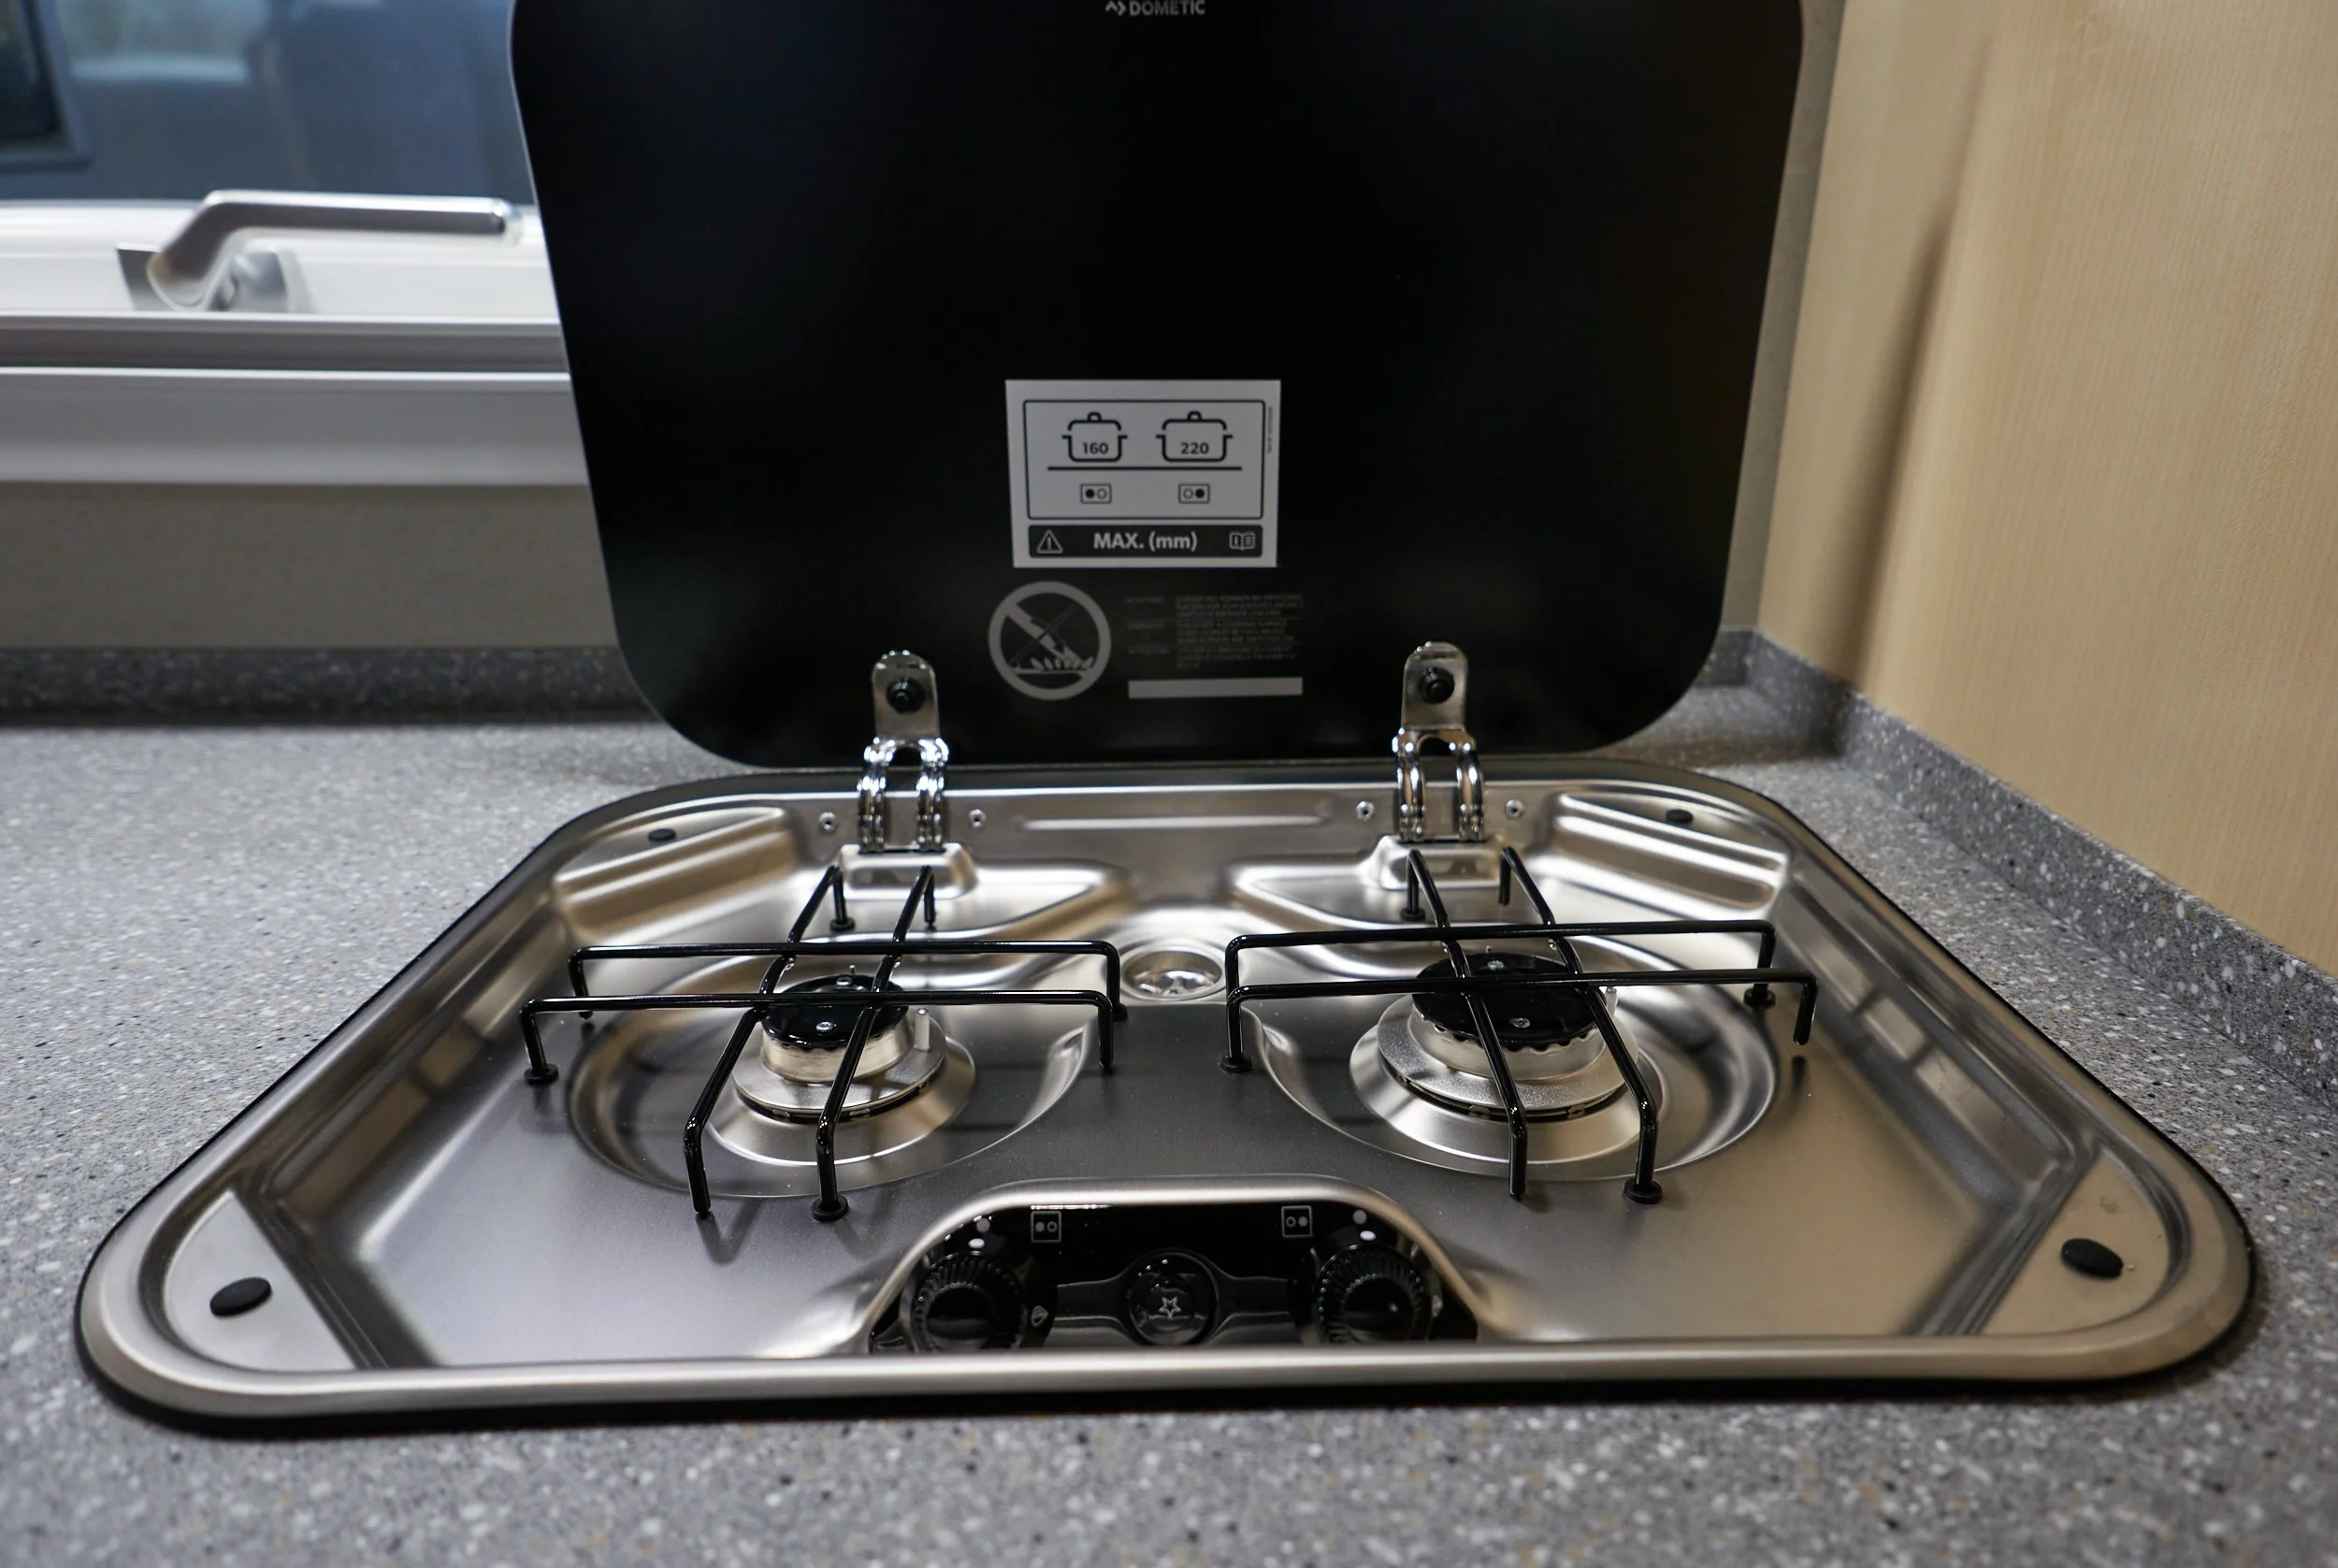
On the kitchen counter, by the refrigerator is our stove. It’s only a two burner stove. We opted against a three burner stove because the three burner stove has the same footprint as the two burner and it seemed that it would be too difficult to operate 3 pots on such a small surface (a point confirmed by Bimobil as a complaint from owners who had opted for the three burner stove). We figured if we can’t make do with two burners and an oven, then we’re hopeless.
After that introduction to the inside, we stepped outside and started talking about the area getting into and out of the vehicle. BTW, that’s Kris sitting down taking notes for a few finishing tweaks to be done, and yours truly gesticulating for who knows why. And yes, we’re both wearing masks.
From this shot you can see the dining room wall extended above my head. It really does offer a grand view from the inside. By my shins are the steps into the living cabin. They retract using a switch that can be accessed from the outside (it’s just inside the door near ground height) and another from the top of the stairs. Another great safety feature is that if you turn on the vehicle engine with the steps extended, a siren goes off in the driver’s cabin that you might think means Russian bombers are about to blow you to bits, but really means you forgot to retract the stairs. I have a feeling that after a few ear-blaring blasts, I won’t be forgetting to retract the steps.

At the top of the stairs is the main electronic control center. It is so well designed and, in a word, logical. Everything makes sense, to include the graphics. The aluminum panel with “bimobil” written on it allows you to check the water level, waste water level, battery power, and solar charging (and a couple of other things I’m sure). The black pad to the right is the heater control for the Dometic heater/water heater system. The round button in the square on the bottom retracts/extends the stairs. The big rocker switch to the left of that is a master light cut-off for when you want to turn off all of the interior lights as you’re leaving the cabin (what a great idea!) so you don’t have to go and turn each light off. That very small rocker switch to the left turns the outside light on and off. Above that is a thermostat for the interior temperature (which you can check on the aluminum bimobil control unit). There is a corresponding exterior temperature thermostat underneath the vehicle.

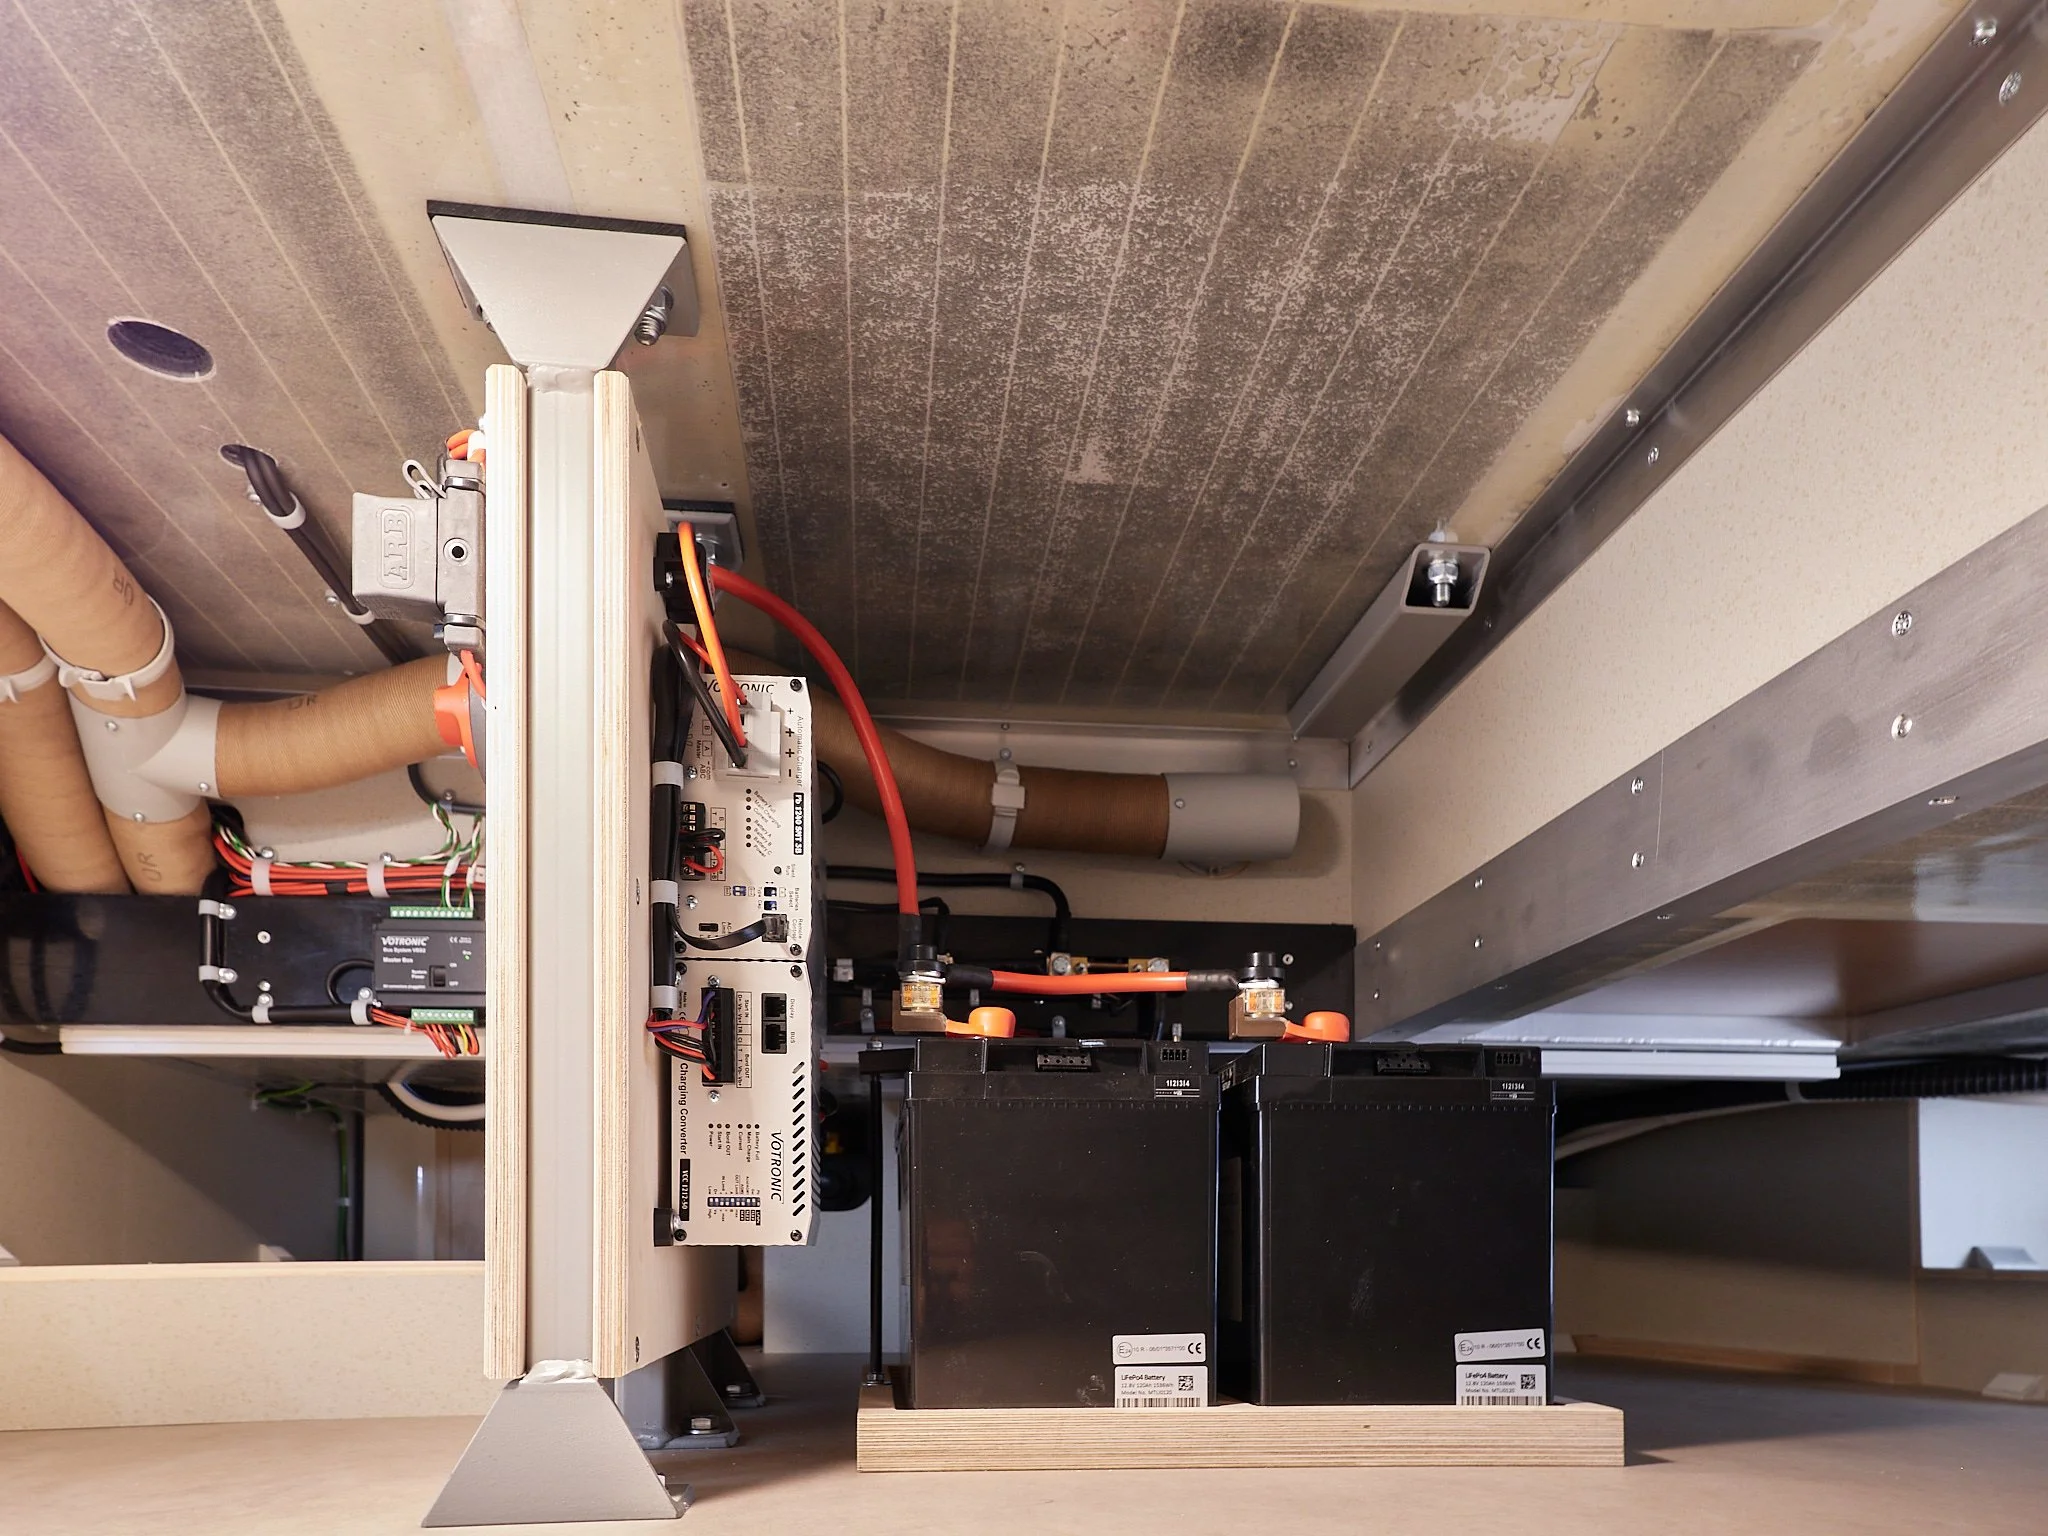
The overall electronics are similarly well organized. Underneath one of the dining seats is the wiring control center with all the wiring and fuses (and diagrams of what does what), organized as Kit put it, “So any electrician anywhere can understand what’s going on.” You’ll also see that there is another collection of electronics by the house batteries, to include a master power switch.
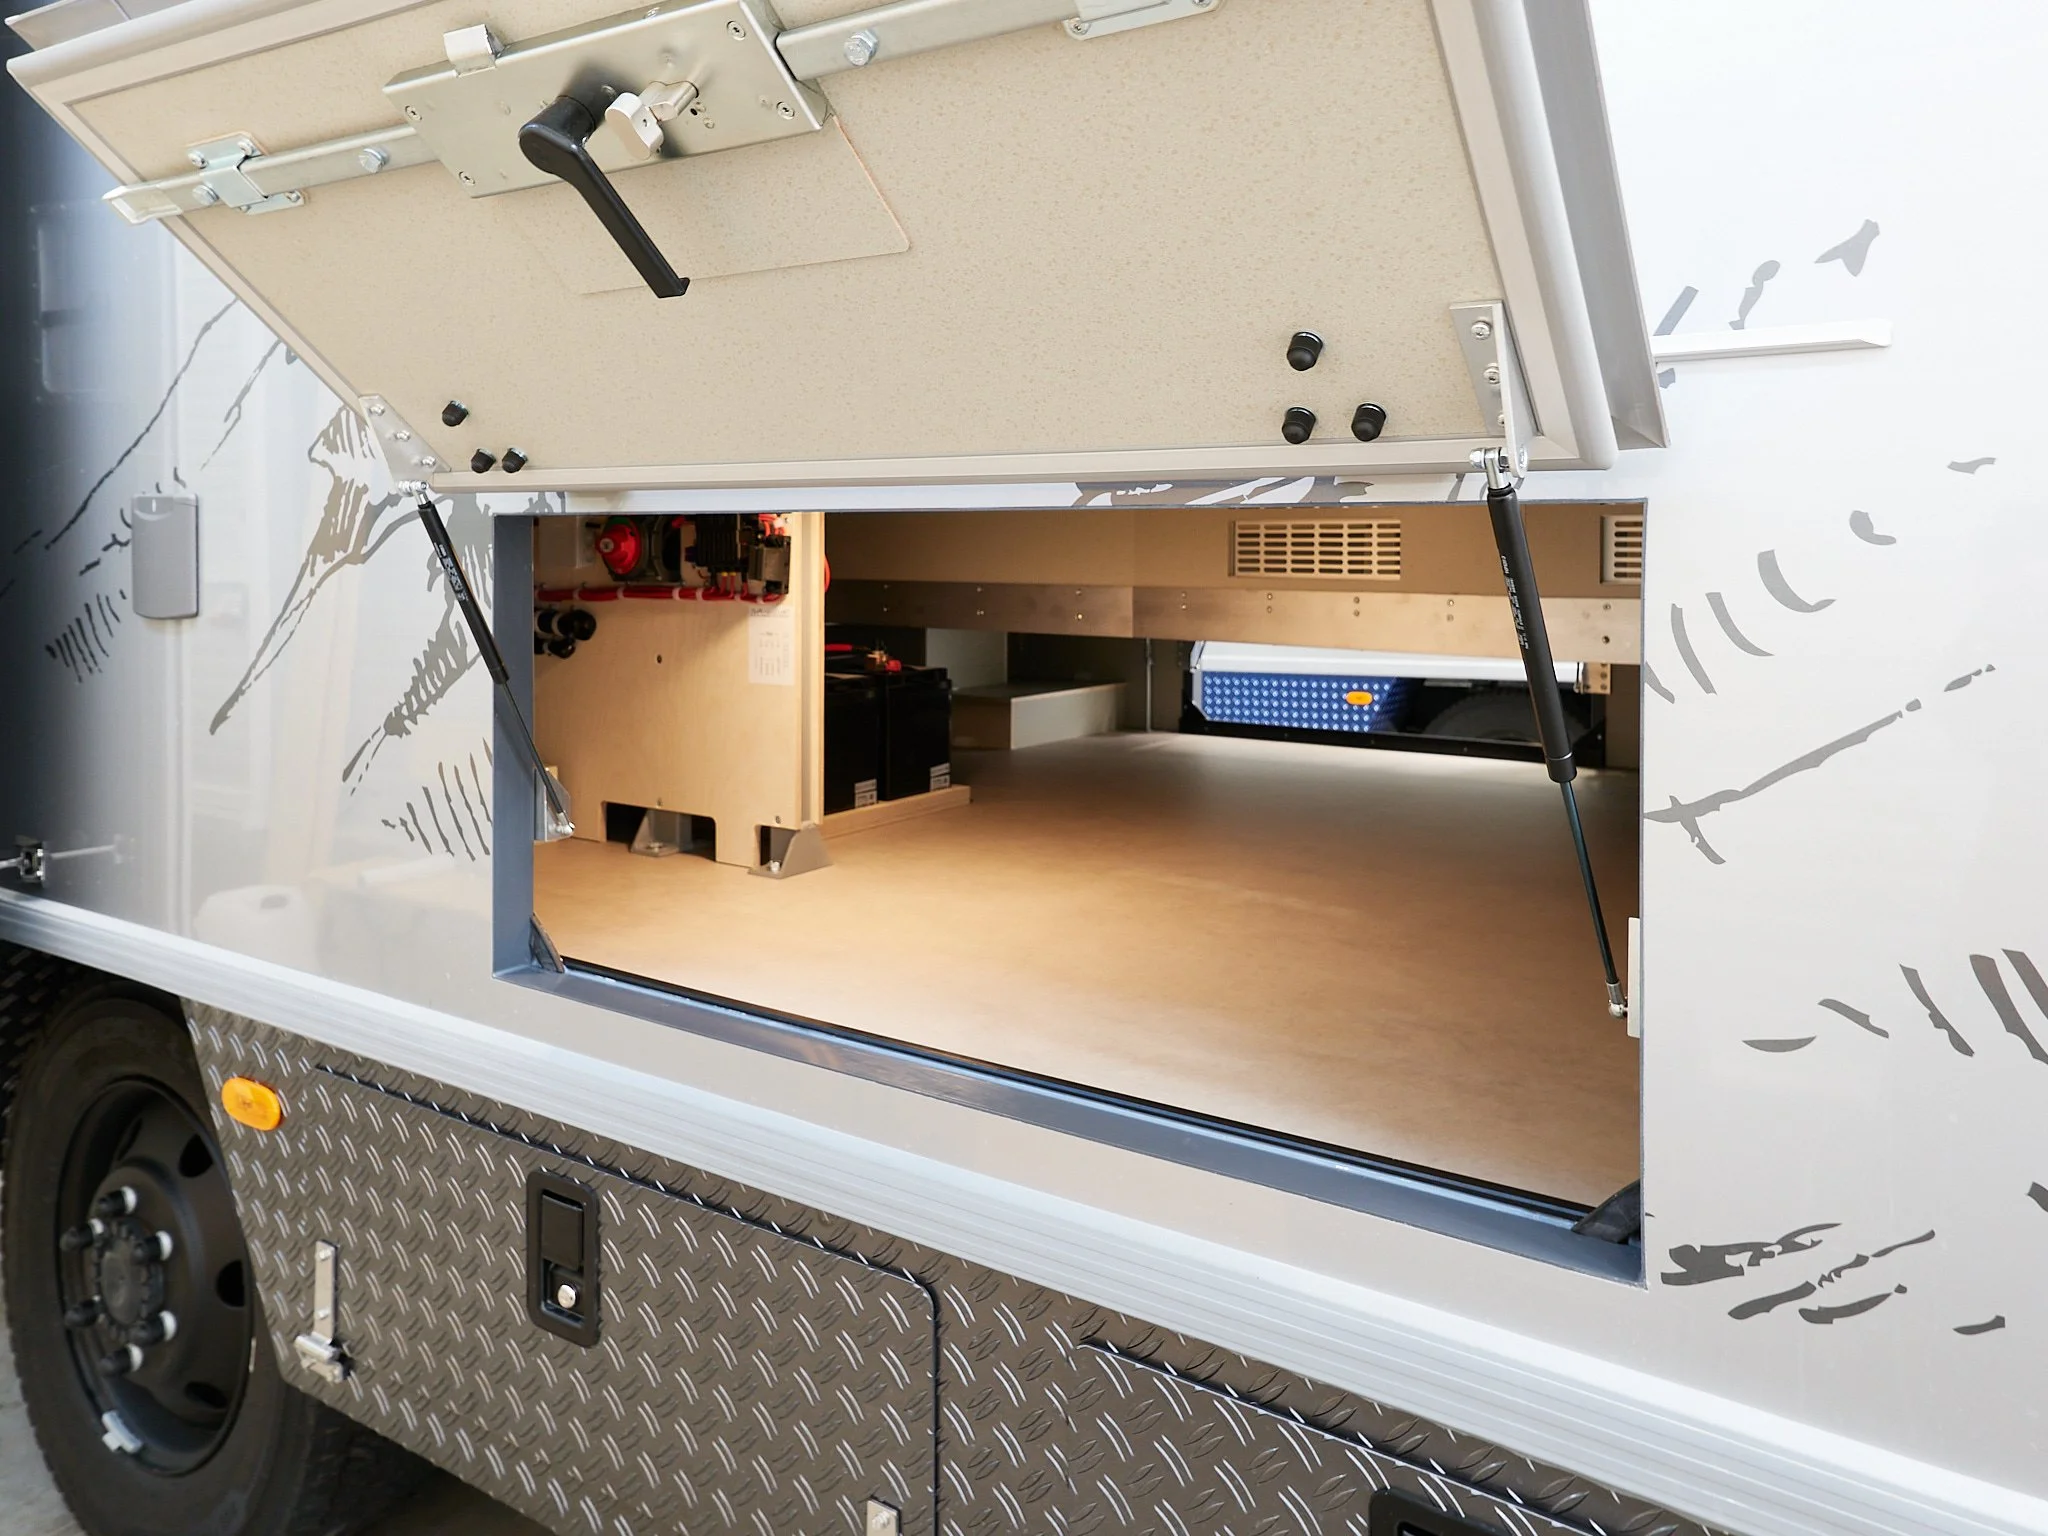
As I’d pointed out in a previous blog post, we’ve made sure that we’re off-road ready and suited for more expedition-type adventures. Given the weight of the vehicle, we could not use the MaxTrax that we used with Beast. Instead we have aluminum sand-ladders. They have their own locks to prevent easy theft (thank goodness). We also have a second spare tire. Given that each tire weighs about 75 pounds . . . or is that kilograms, there is a crane to help raise and lower the tire. The main spare is on the underside of the vehicle, just behind the bumper where the second spare is. That too is on a lift system that operates with a long rod that spins a lift that will lower the tire once three bolts are removed. It’s good that Kris tried to show me how that operated because he realized that it wasn’t long enough to operate properly because of the location of the second spare. They’d forgotten to include the extension. Karsten has already e-mailed us that they have already added the extension they use in the location Kris told us it would be (latched onto the underside of the flap you can see by Kris’s head below.

This is the driver’s side of the vehicle. You can see the various windows - bedroom, kitchen, upper and lower bunk - as well as a couple of the storage area doors open. Like I said, there’s a lot of storage to be had with this model, accessible from inside and out.

The area under the bunk beds is a major storage area that also provides access to key components of the build. The first of note is a ceramic-charcoal water filtration system that we have. The sink has two faucets. One is a standard hot-cold faucet that pulls water directly from the water tank (195 liters worth). The second faucet is cold-water only and runs through the filter. It’s obviously the drinking water faucet.

On the other side of that storage compartment are two other features. One is an extendable water sprayer with hot and cold water controls that Kris is pulling out. Off to the left you see the ARB air compressor that we can use to inflate tires (and balloons I guess) and to blow dirt off things if needed. It is noisy as hell, which means I’d better never take a nap in that lower bunk because Ann would likely walk around and turn the compressor on just to scare the crap out of me.

The final thing is that we’ve had a fridge/freezer installed in the storage area. It’s strapped down by airline track and straps, and gets power from the 12-volt plug you can see on the left of the photo. We plan to use it for long trips in freezer mode for meats, etc, and we can access it from inside the living cabin by lifting up the bed. While not an ideal solution, it should work for our intended purposes.

One of the main features of the living cabin is an elevated floor. In part, that’s why it’s so tall. The advantage to the elevated floor (which is a heated space) is that water/waste water tanks as well as other build components can be located beneath the main living area and still not freeze when its cold outside. It also allows for even more storage that is accessible from either side of the vehicle.
Here is the access door on the passenger’s side. Beneath that, you see the metal storage areas that are not fully sealed (while the doors have gaskets, there are small drain holes on the bottom that will fill when doing a river crossing) and are exposed to outside temperature changes. The metal door to the left has the large 60 l propane tank. The one on the right is empty and is a great place for tools (if protected from moisture), spare fluids etc.

From the inside of the passenger under-floor access you can get to the two lithium batteries and some of the electrical controls. You can also see the heating vents that extend throughout the living cabin.
Here’s a view from outside the vehicle. As you can see, there is a pass-through underneath the entire floor area (you can see the blue cladding of the vehicle next to ours). I suspect we’re going to have a great time figuring out how to best utilize this space. We can drill stabilizing braces into the floor to secure anything we may want to transport, so there will be lots of options for us as we move forward.
Another good thing this photograph shows are the security door locks. They use a double-slide lock to secure the door. All of the living cabin doors are like that. These vehicles are designed to travel around the world and offer security to passengers and contents wherever they may be.
Here is a view of the access doors on the driver’s side. The under-floor access on the driver’s side is a bit smaller than the passenger’s side, but it’s accessible nonetheless. Here you can also see how the metal under-body storage compartment doors operate. The front one on the driver’s side is narrower than the others (it’s really only about 6 inches wide) but that’s the result of the extended fuel tank we’ve had installed, which extends into the area normally used for storage. We thought that doubling the fuel capacity (and range per tank of diesel) was worth sacrificing a bit of storage space.

Kris did not need to explain much about the interior of the driver’s compartment, I’ve already done a lot of research on that. One of the things folks love about the Iveco Daily is the seats. They’re traditional trucker air suspension seats, which many people have said are wonderful off-road - they absorb many of the smaller, jarring bumps that make long-off road driving so exhausting.

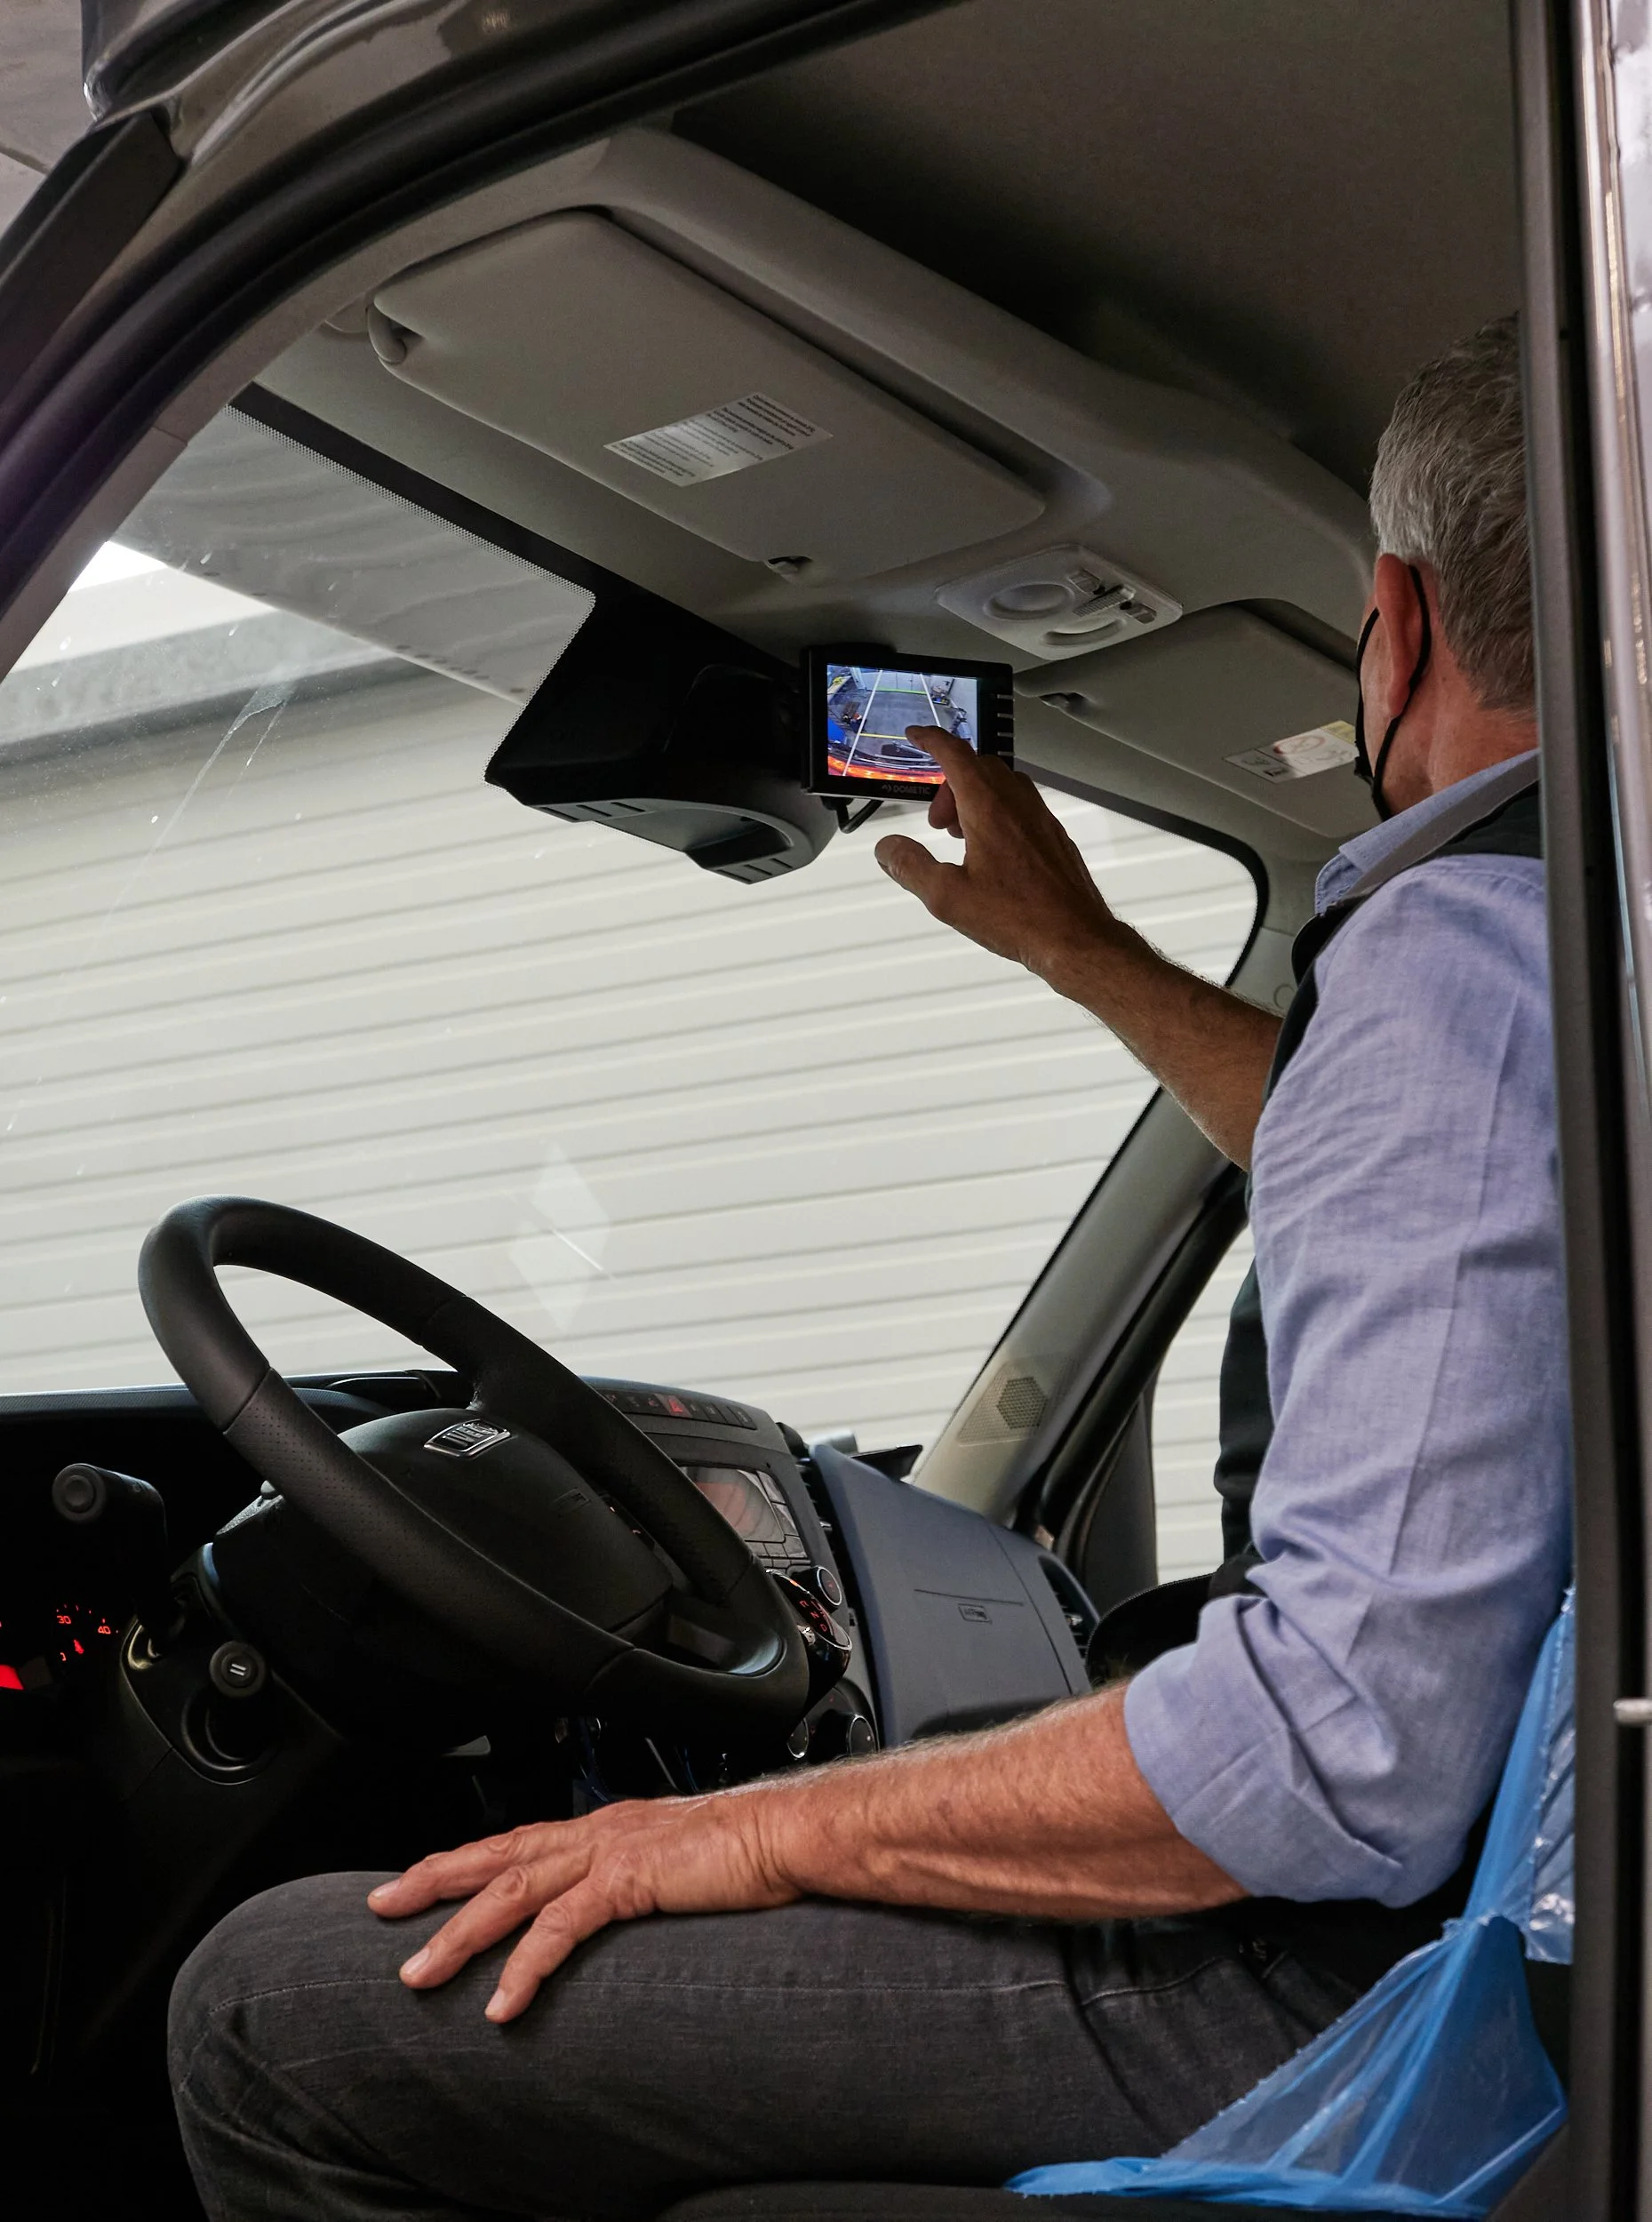
The main thing that needed to be explained is the rear-view camera system (you can see the camera on the top of the vehicle in the shots of the rear end). Bimobil places the viewing screen right where the rear-view mirror would be and it acts exactly the same. The system used has two modes. One gives you a view as if you were looking backwards in the rear view mirror. The other has parking lines for when you’re backing up straight, and an indicator warning line that lets you know when your’e getting close to the back of the rig. Important here is that bimobil adjusted it to take into account the tire that extends behind the vehicle. You can see Kris pointing that out below.
Also worth noting is that the interior has that upper storage shelf that Ann and I so appreciated in Beast. It’s the perfect place to place key travel tools, notebooks, etc.
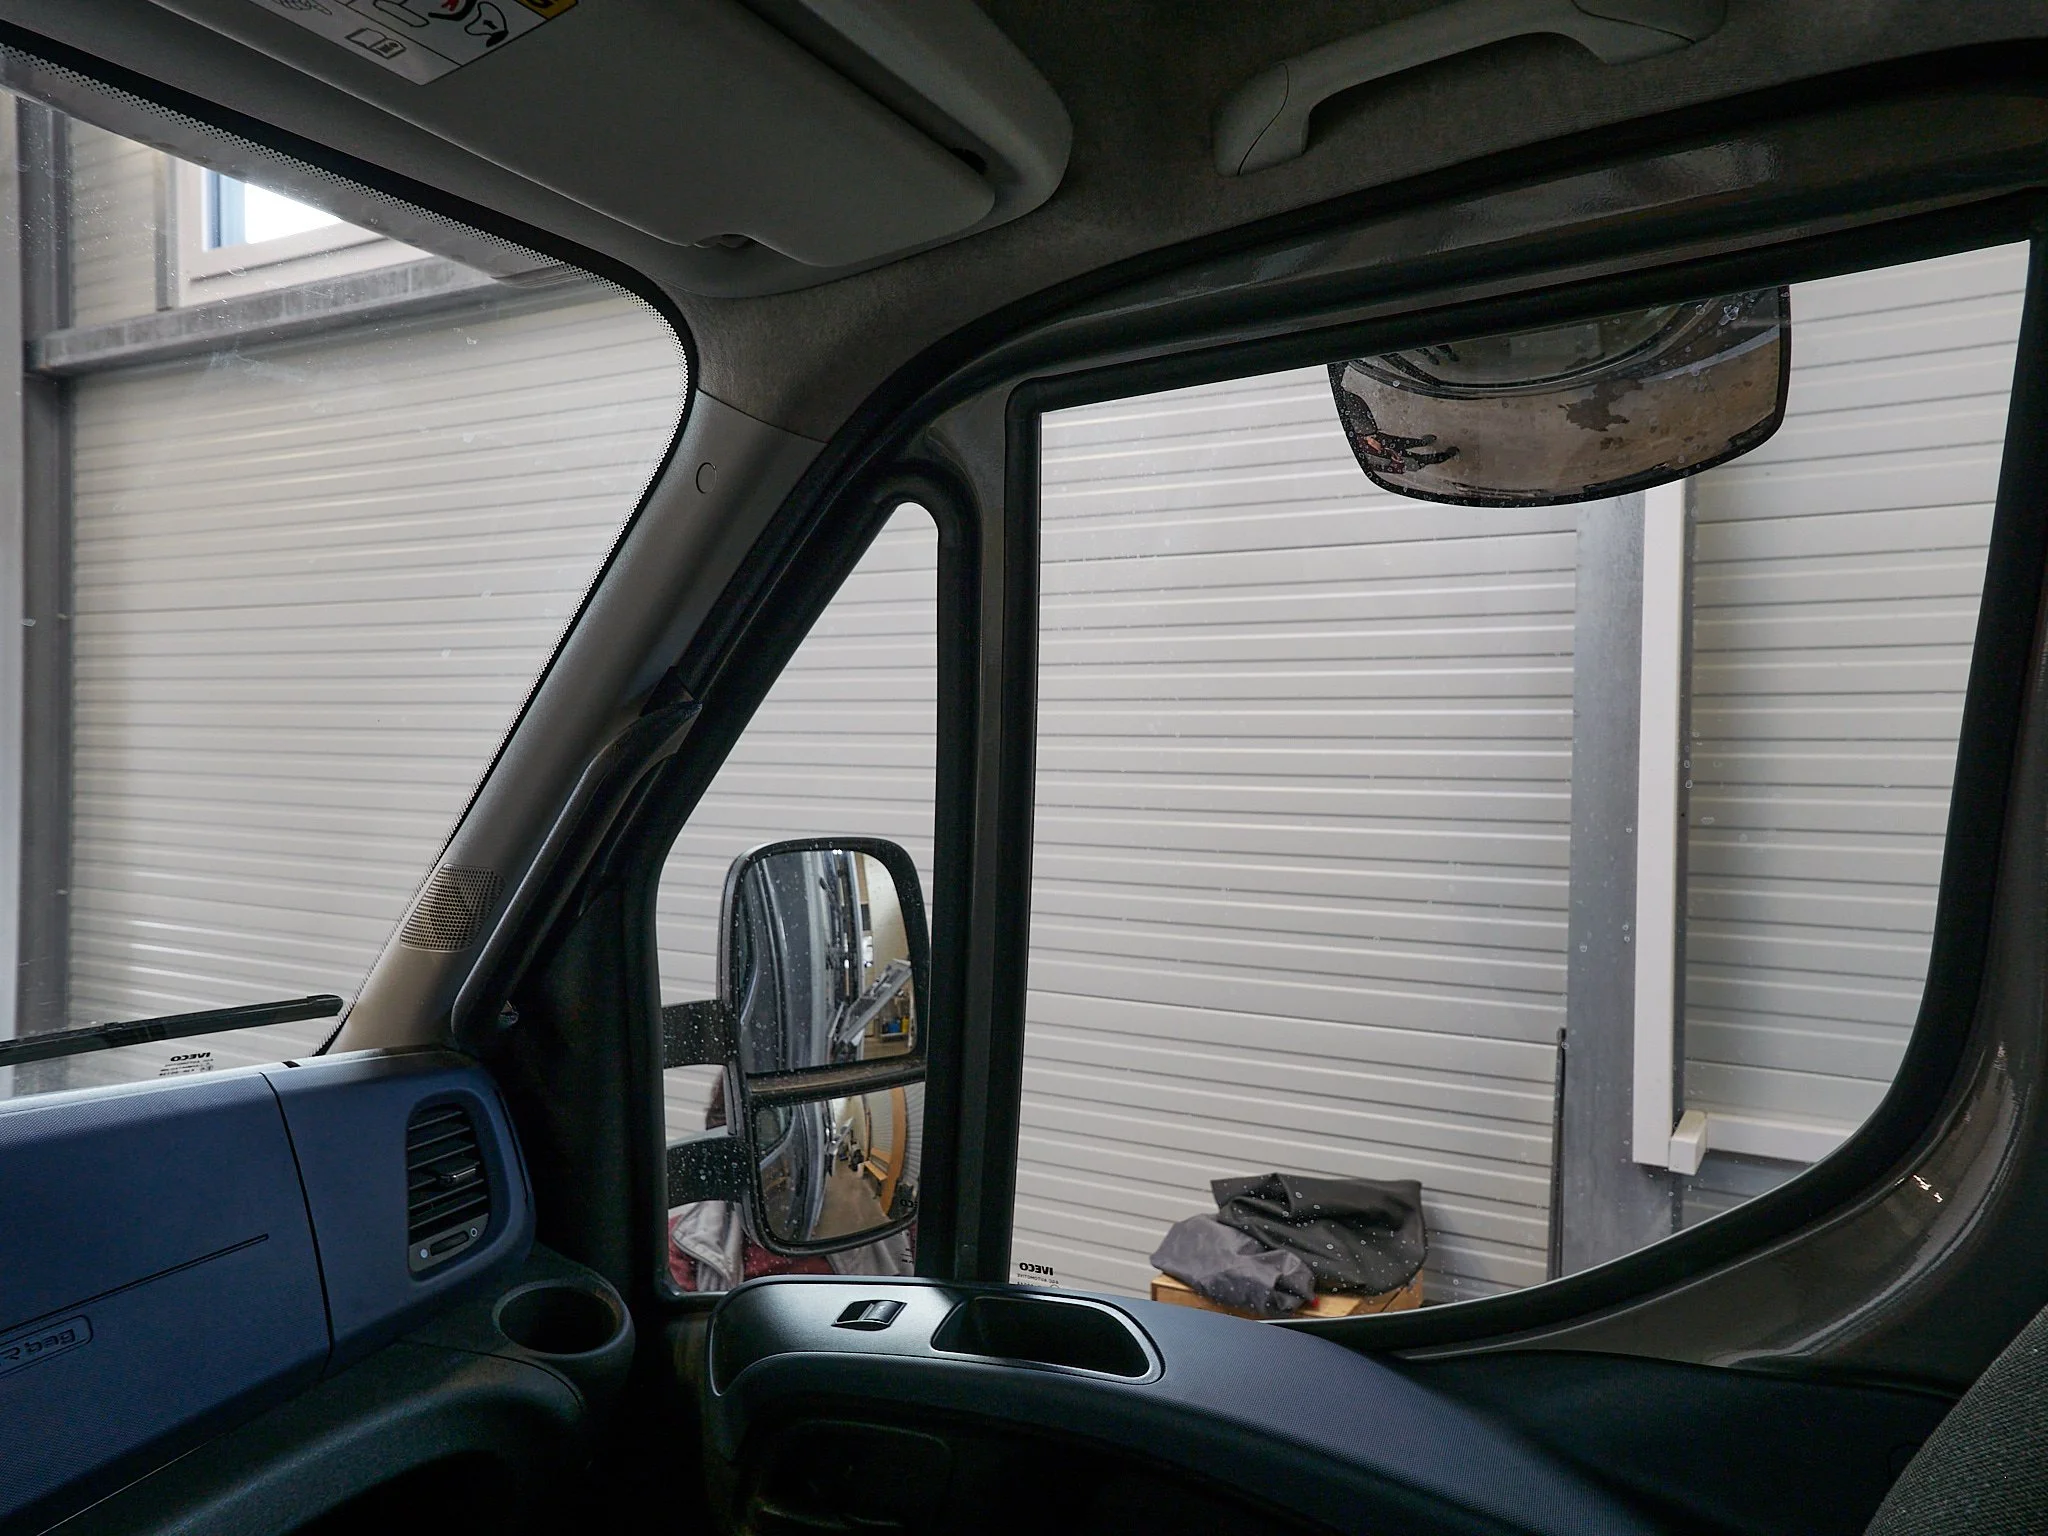
One additional thing I liked in the driver’s cab is a downward looking mirror that is located on the top of the passenger’s door. It allows the driver to look down and see along side the front of the vehicle - critical for when you’re navigating around rocks or tree stumps when off-road. If you look carefully, you can see Ann’s feet by the front tire in the left part of the mirror.
Returning to the interior of the vehicle, you can see the pass-through door from the driving cabin into the living cabin. It’s a tight squeeze but it works. Importantly, we can park and get into the living area during inclement weather without going outside. Just as important, if we want to ship the vehicle, we can lock the living cabin from the inside and people who may drive the vehicle cannot gain access to our stuff . . . or who might break into the driver’s cabin. The door is held open by a magnet that connects to the floor bumper. The magnet is strong enough to have the door open while driving off road.

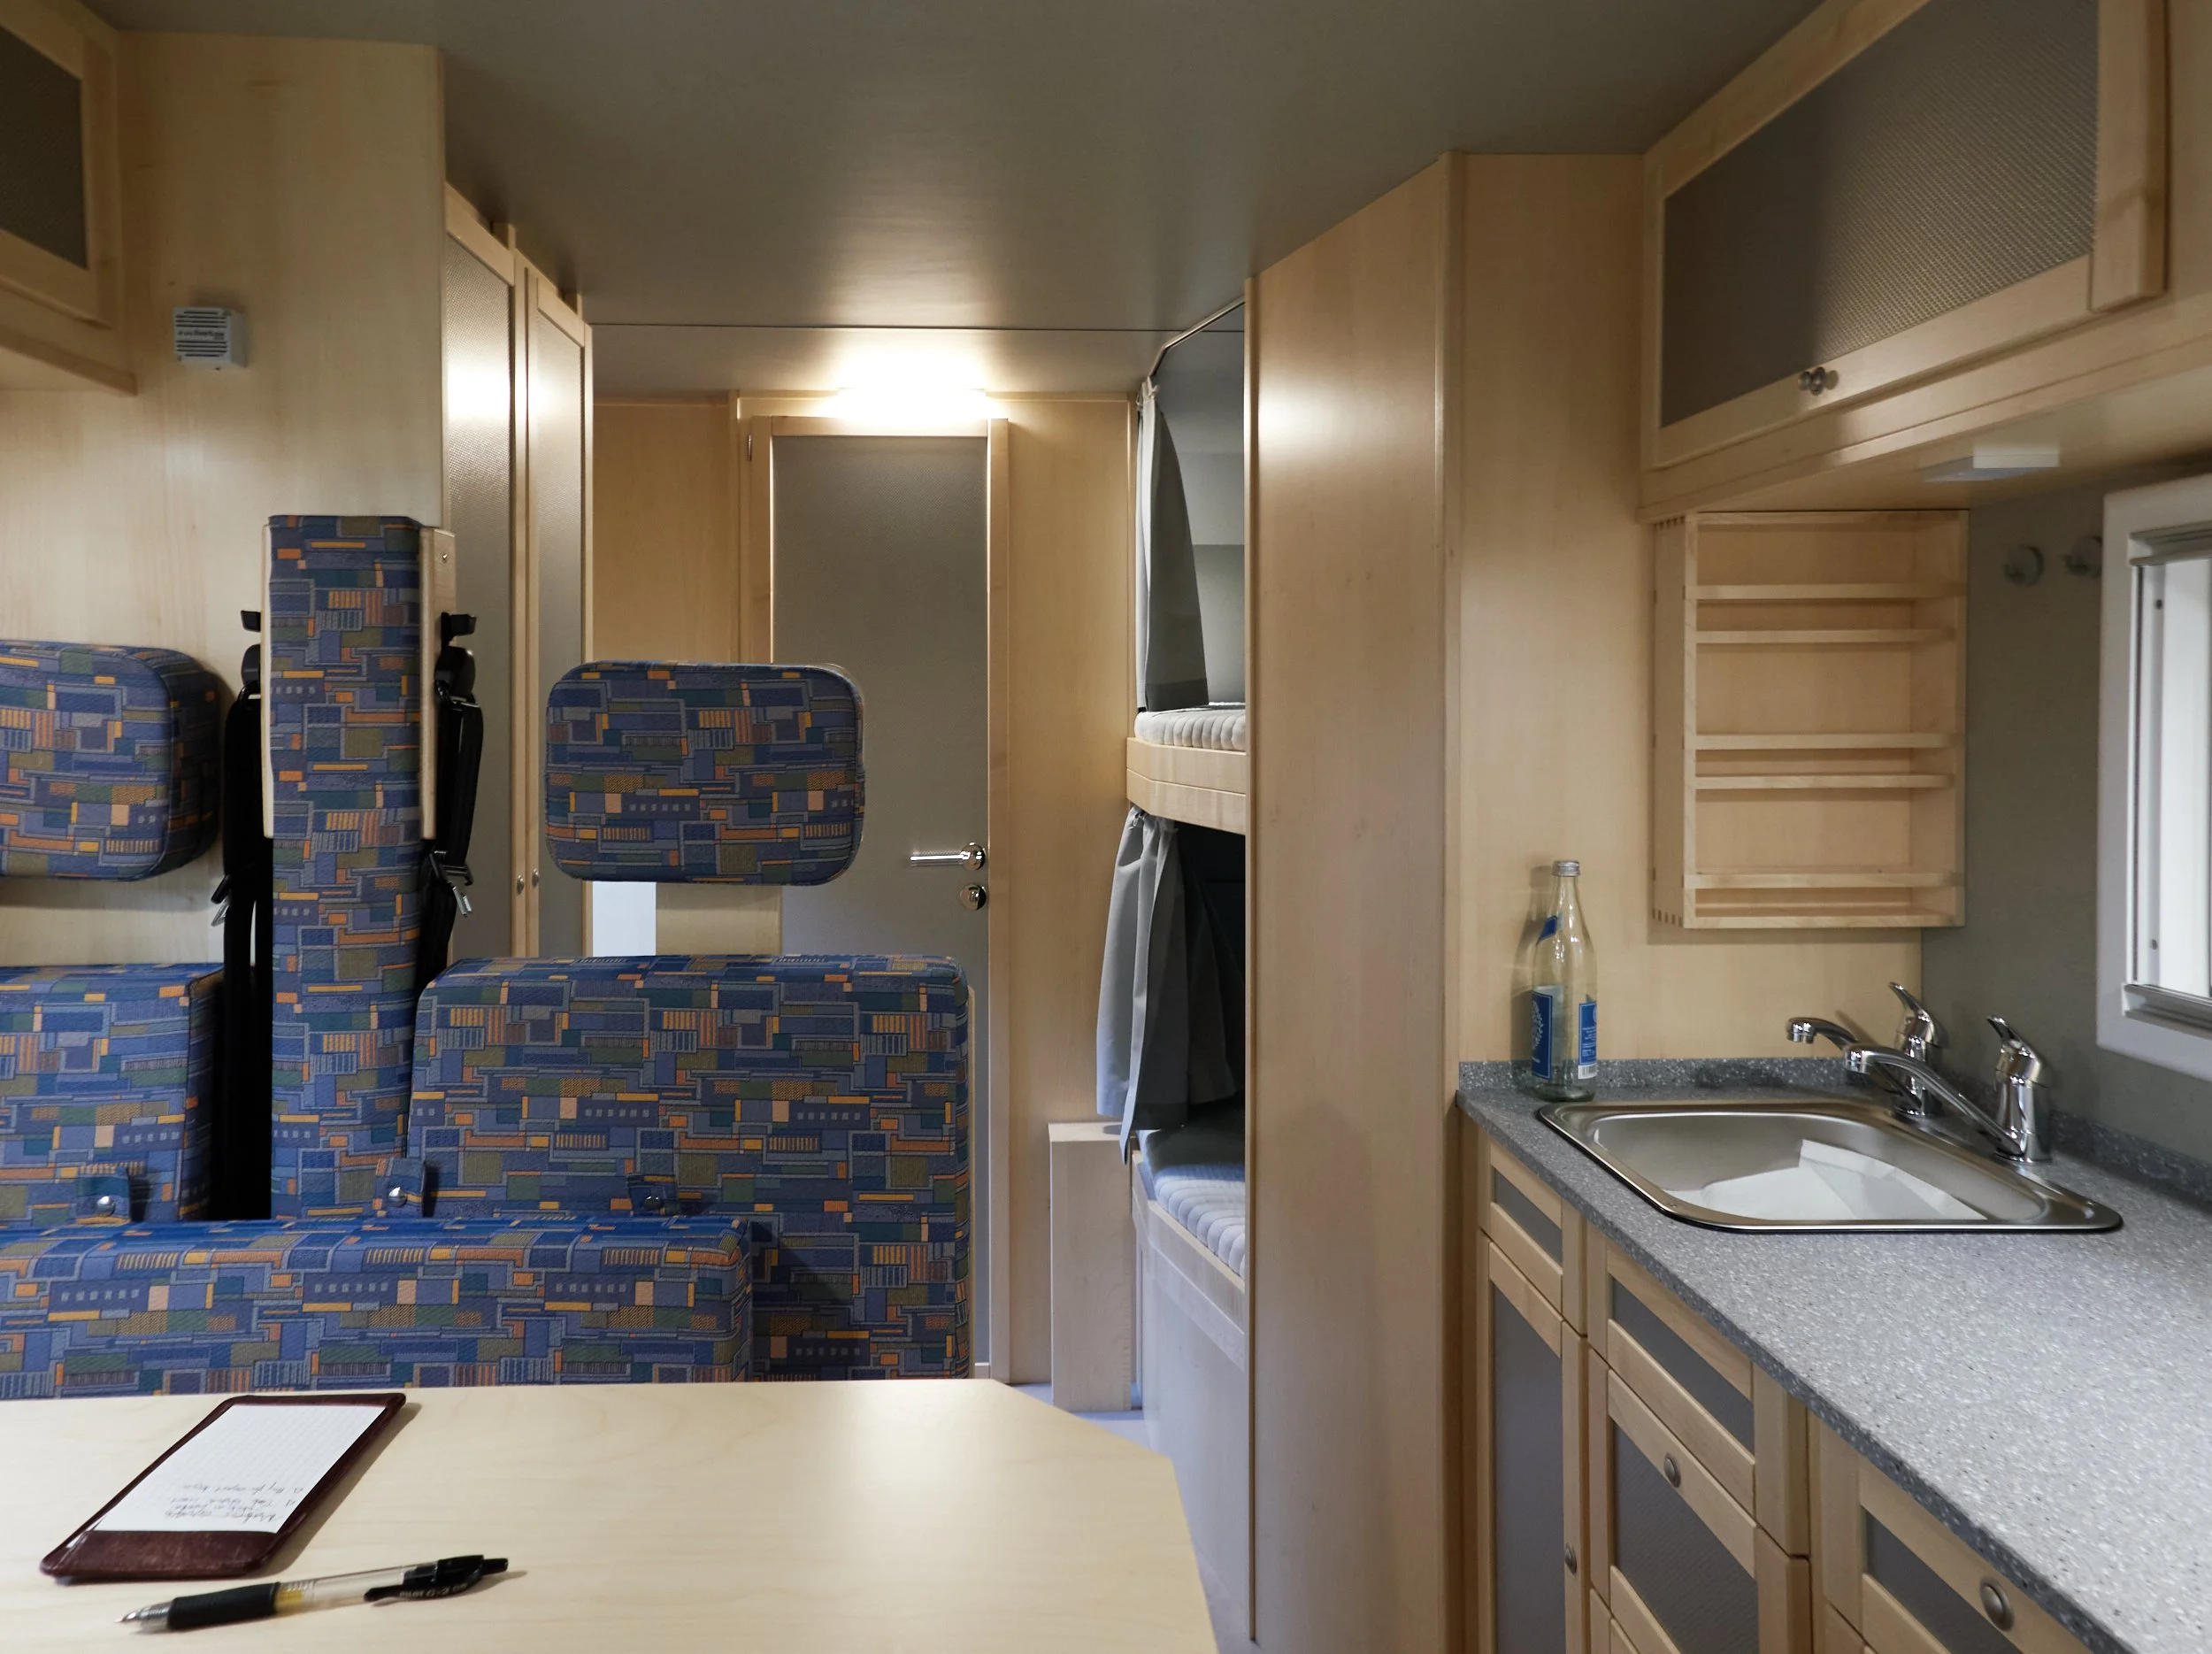
Here’s a couple of images from the inside looking towards the rear. You can see the plentiful kitchen cabinets as well as the seatbelts for the forward facing dining room seats.

A more revealing view shows the shoulder seatbelts on the left. Moving to the right you see two closets, one full standing and one with shelves. Then there’s the bathroom door and the two bunk beds, with privacy curtains. To the right you see the famous bimobil spice rack, and the two water faucets I discussed earlier.
Moving into the bathroom, we have a full shower that we can actually stand up in!
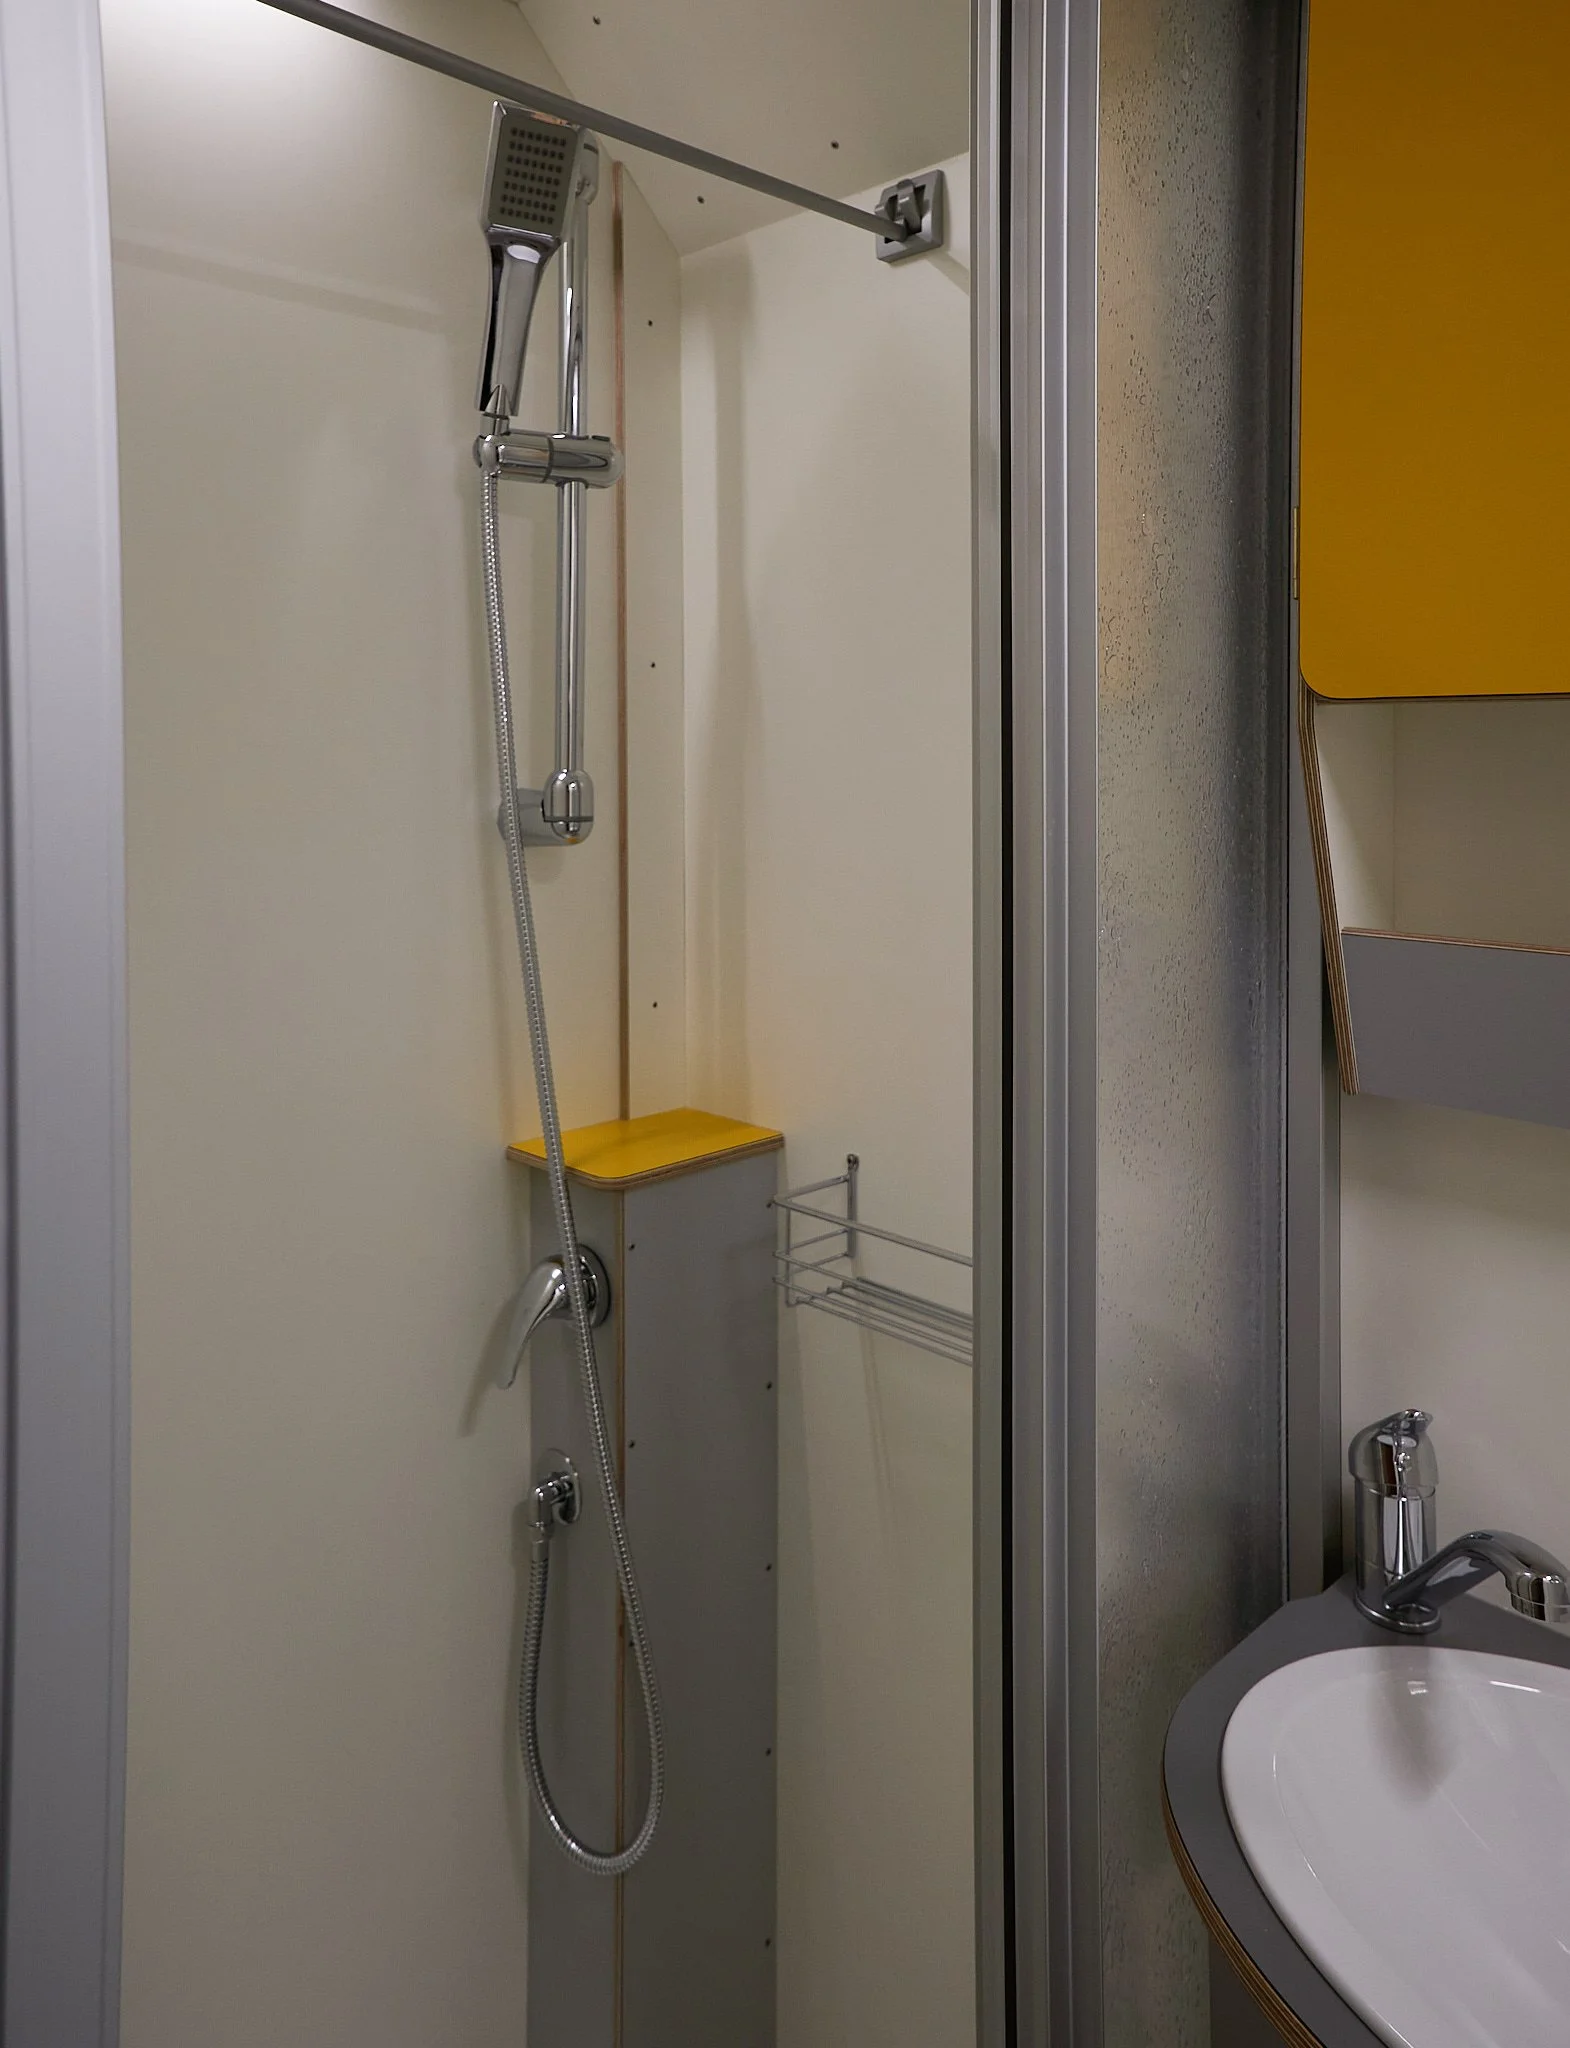
The bathroom area has an overhead vent as well as a window that can open. Storage is on the back wall and the wall to the right is a mirror. We’ve opted for a Nature’s Head separator toilet instead of a Thetford toilet similar to what we had in the Sportsmobile. In theory, it should smell a lot better, produce compost, and only need to be emptied once a month or so with two people using it.

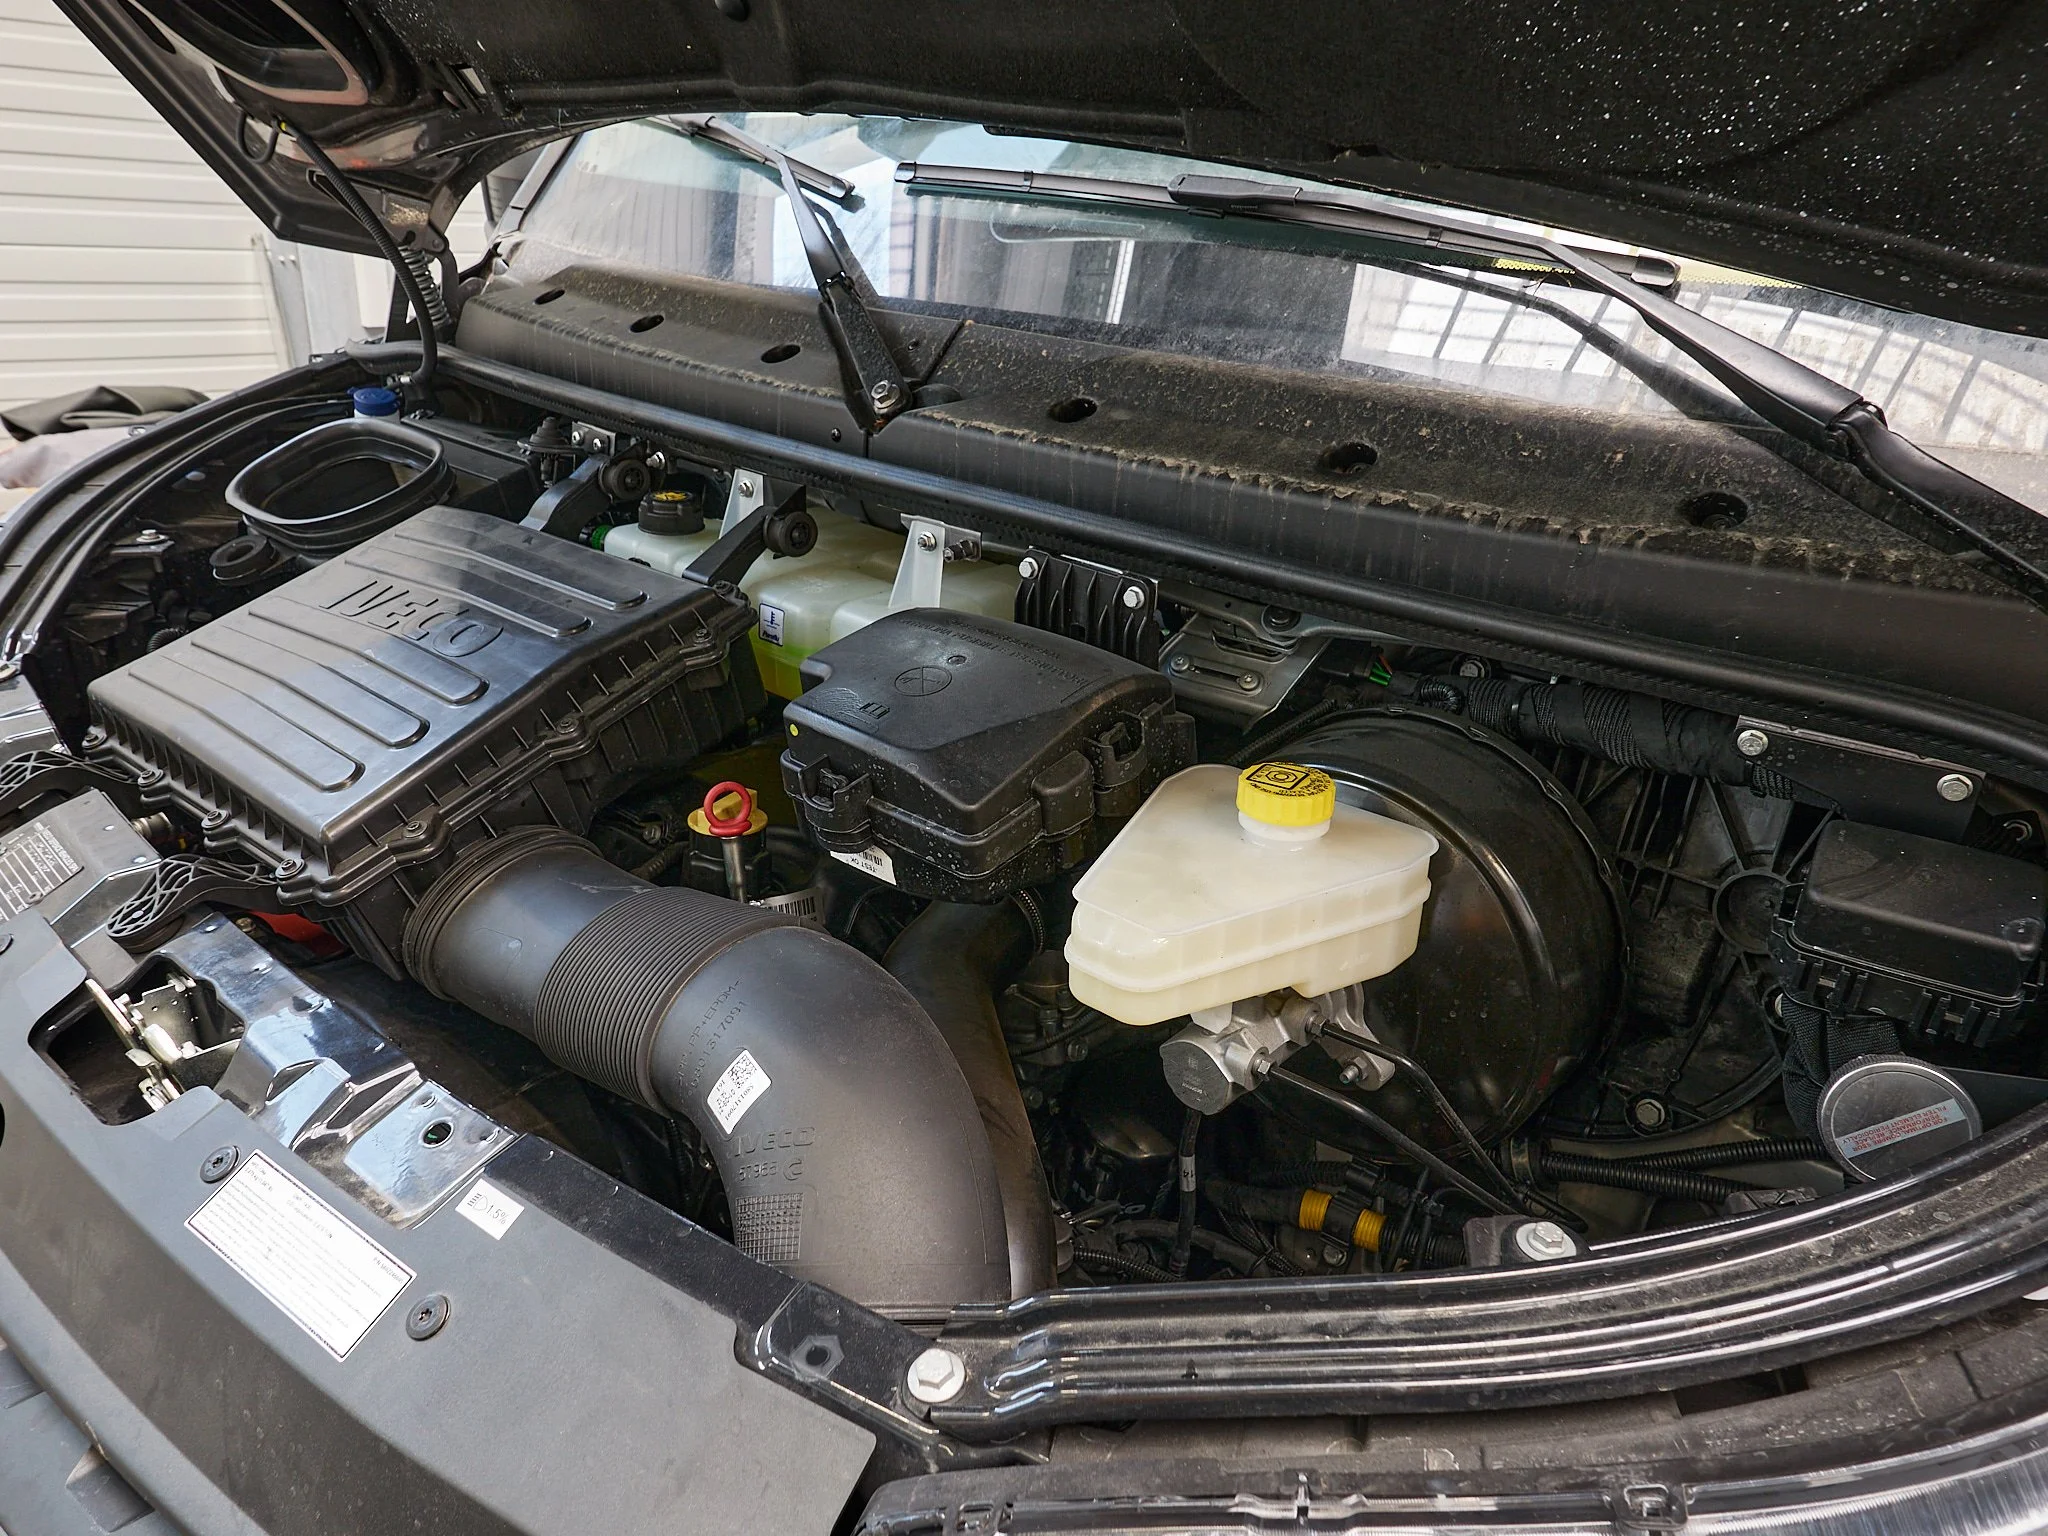
I guess about the only thing that hasn’t been covered is the engine. It’s a 4-cylinder Diesel engine that is powerful but not speedy. That works for me given my Speed Racer days are over and it’s torque that rules off-road. I checked it out just to see if I could figure out how to open the hood (yes, I could) and to see if all of the fluid checks/fill up locations were accessible. As one might expect from a vehicle designed for commercial use, they are.
I guess the final point to make is that when you buy a home-like vehicle, you get all of your documentation in a lovely metal carrying case. Nice! Though it looks like it really should have a chain to cuff it to your wrist when out in public.

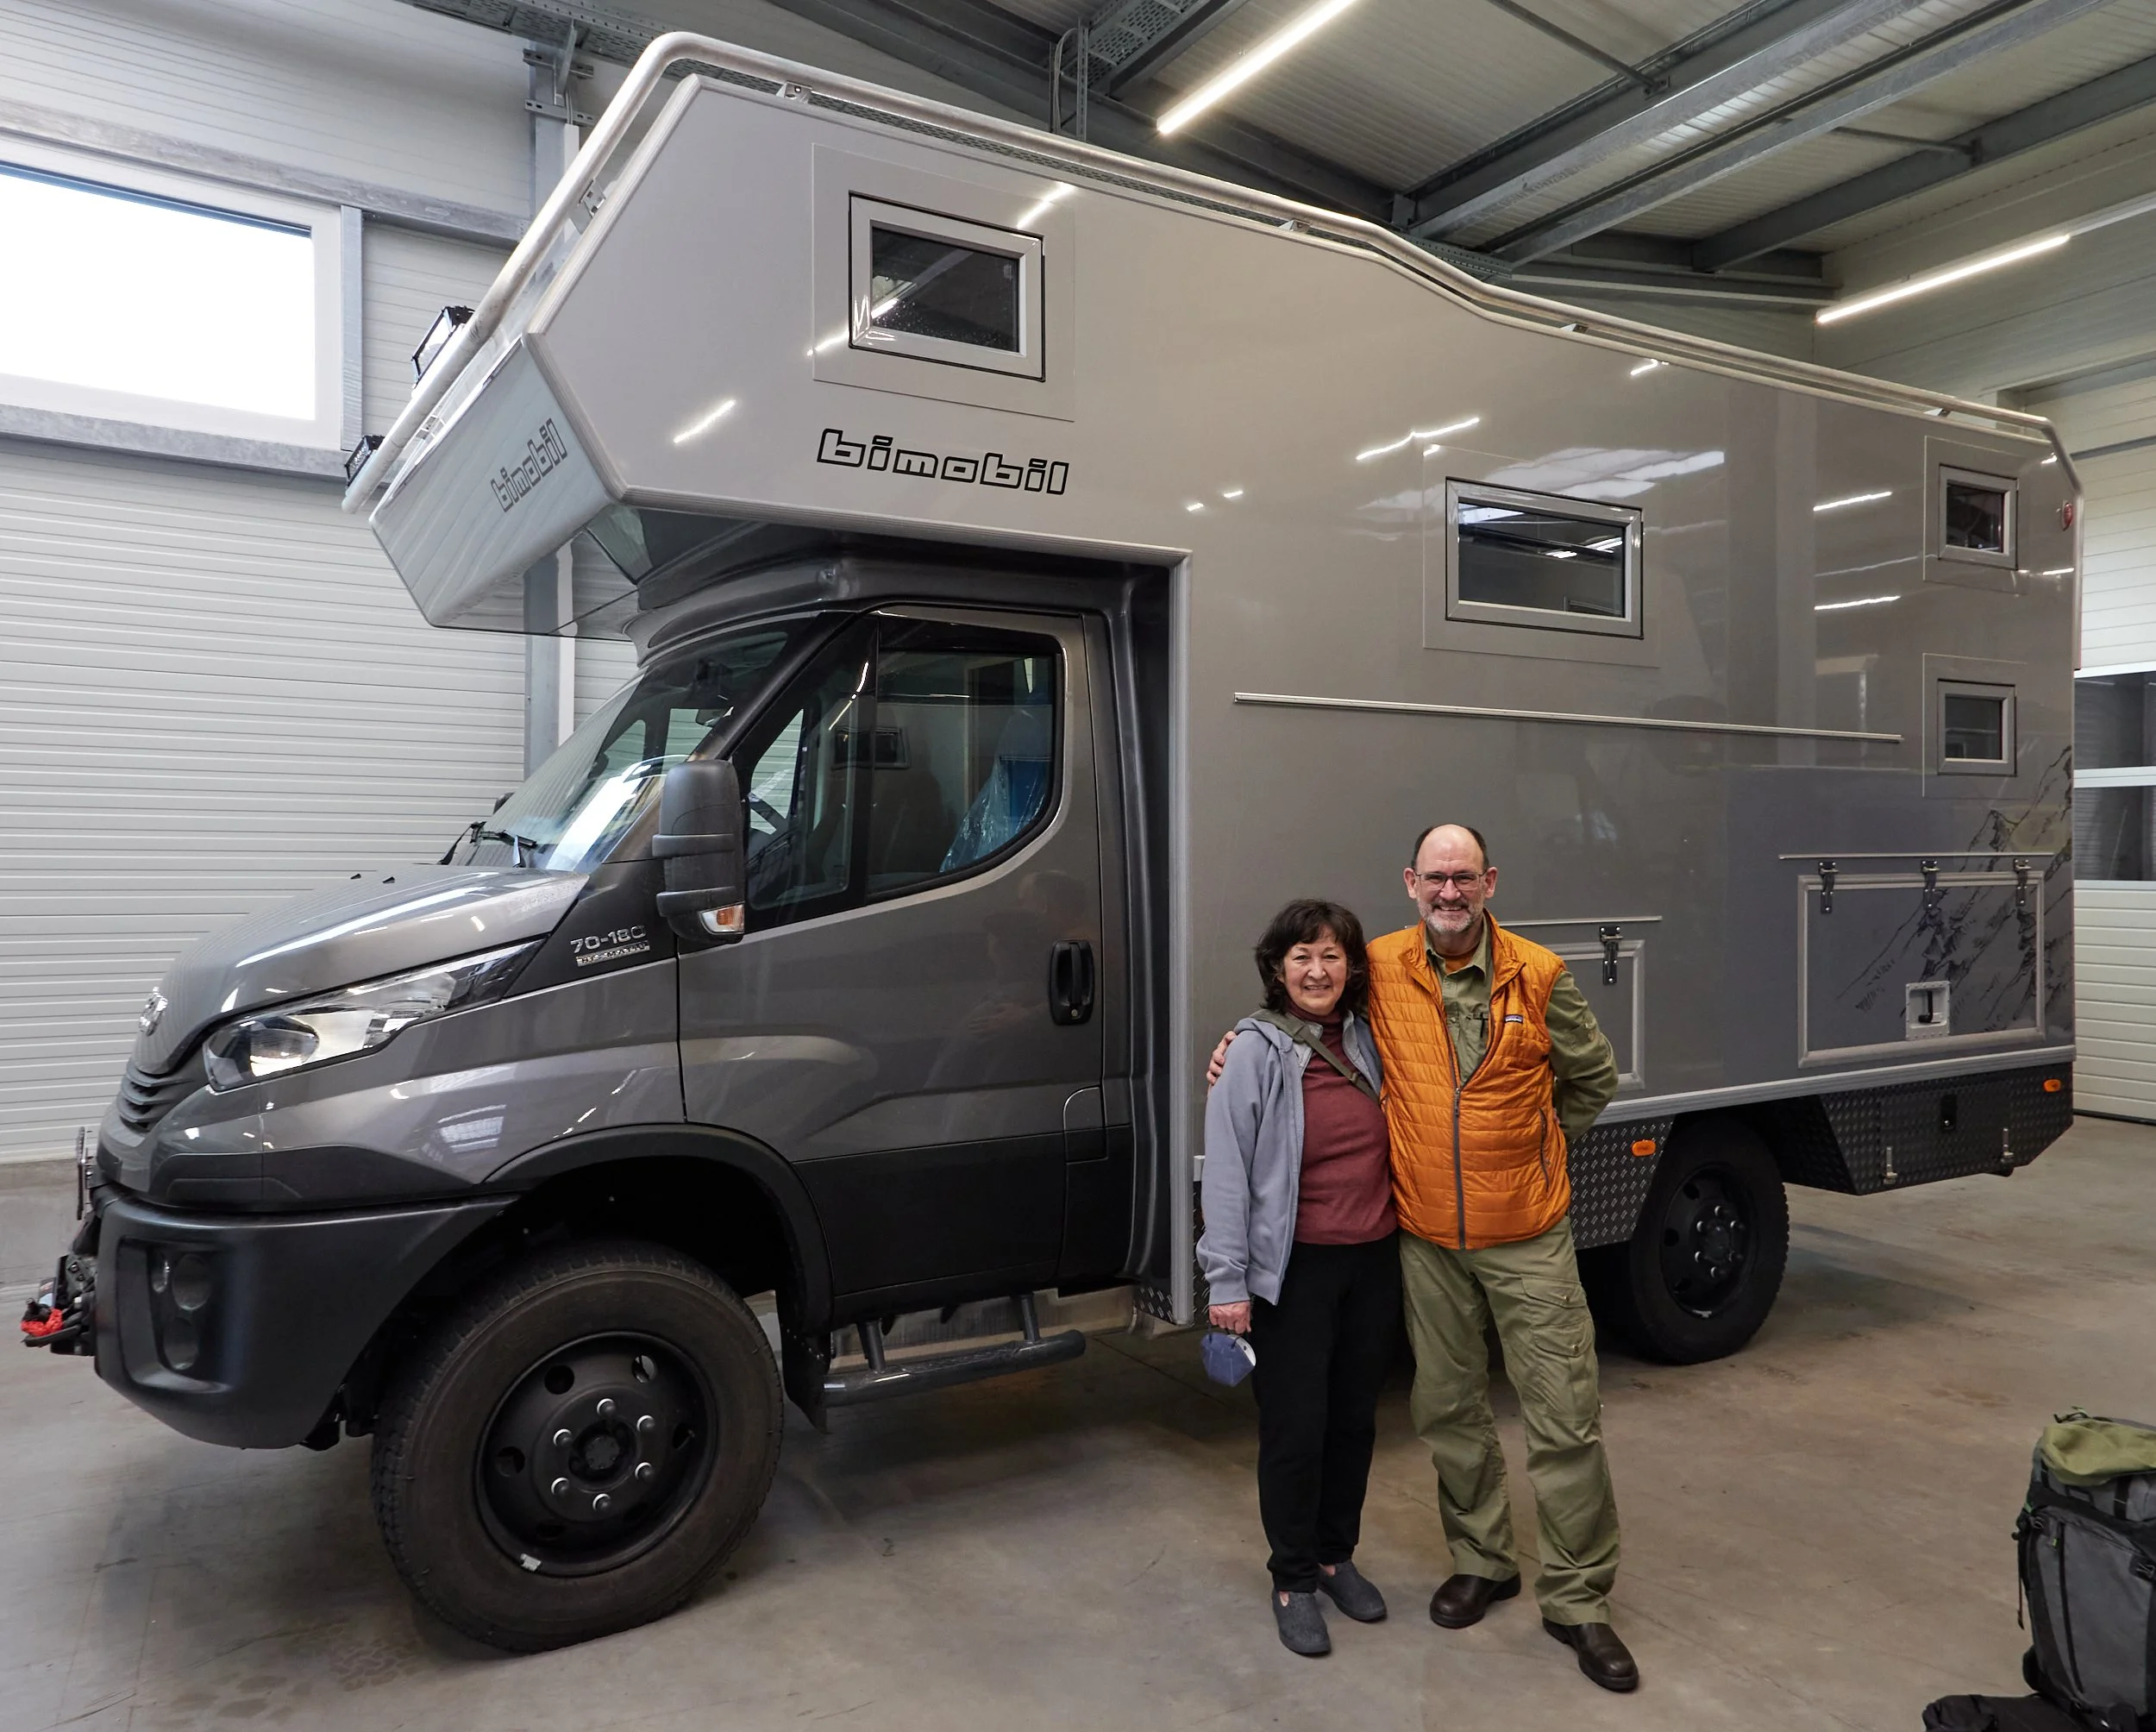
Well, that’s it. Ann and I are now the proud owners of a bimobil EX 420!
Now to have the transport company pick up the vehicle so we can begin the Portugal inspection, fees and registration process started!