(NOT) PRINTING THE IMAGE - HOT PIXEL EDITION
Ann and I love to photograph during what I call the edges of light. It’s those transition periods of day and night where amazing things can happen, both with the light, but also in how you perceive a place. Those “edges” also include taking advantage of unusual light sources, such as the moon. We’ve photographed by moonlight at the Painted Hills, Yosemite, Southern Utah and Death Valley, among other places. We’ve even planned photo trips based on the phases of the moon.
Digital photography, especially in the past decade or so, has opened up a world of image-making that simply was not possible previously. Given the linear nature of sensors, there is no reciprocity “failure.” When shooting large format film, I had to compensate for the emulsion “failing” over long exposures. With a calculated 1 second exposure, I actually had to give the film a 2 second exposure; if it should have been 2 seconds, I would have to give it 10 seconds and adjust the development time accordingly. Also, as sensors have gotten better, they perform better at higher ISOs (though I try not to touch that dial if I can help it). Digital allows me to make images like the one below utilizing the glow from the moon to make the image.
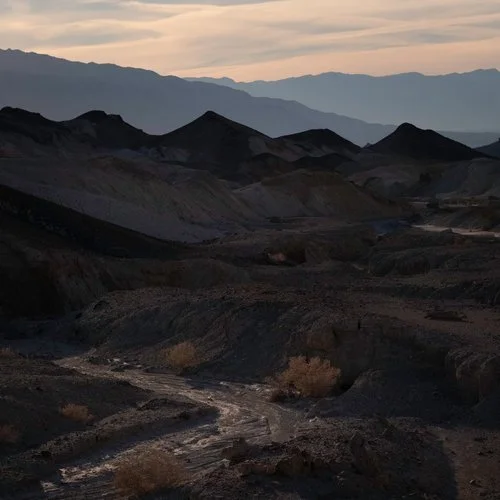
But not all is perfect with digital image-making as my recent attempt to re-work the above image revealed to me. You see, I came across this image while preparing for the new blog site and decided I would re-work it from scratch and print it. Print it large. And that’s where it tripped me up.
You see, by the time I’d made this exposure, I had made a lot of images that morning. This one was a 30 second exposure at ISO 800, many of the previous images required just as long, if not longer, shutter speeds. As sensors get used, particularly with long exposures, they heat up. And when they heat up, individual pixels start acting up (not all pixels are created equal, apparently some just do not like the heat). Anyway, what happens is that they tend to just white out. Here’s a segment of the small hillock, second from the right, from the original file of the image above.
No, there were not field mice with little headlamps out there (not so preposterous if you recall I had previously seen a “hot pixel” on one of our Yosemite night shoots . . . until I realized it was a climber’s head lamp on El Capitan . . . at midnight - the light was slowly making its way up the wall). The white spots in this image are hot pixels.
Here’s another segment of that same frame, from lower down in the image. Some of the bright spots are reflections off smooth rock surfaces, most of the bright spots aren’t. They’re hot pixels.
That’s when I learned that there was one advantage Lightroom has over Capture One. You see, the image I used at the top is the old .jpg from Lightroom, which has a tool where you can flag dead pixels and deal with them directly. But I wanted a better print than I could get from a .jpg, so I wanted to rework the image from the RAW file. Capture One operates a bit differently than Lightroom. While there is a “pixel” slider in capture one that is supposed to help with hot pixels, it does not totally get rid of them. It wasn’t good enough for getting an image ready for a large print. And Capture One’s spotting tool only allows you to retouch so many spots. While over 100 spots sounds like a lot, it was nothing compared to the number of hot pixels I had in this image. If you look at the sky in the upper detail image you see it’s clear. Well, the spotting tool ran out of slots by the time I hit the hills.
While I haven’t given up on the image yet, the hot pixels definitely put a crimp on our planned printing session. I guess I’ll have to find another image to print, because it’s about time to get that ink flowing!